
Publishing
Radial Timeline publishes a Radial Timeline book, a folder of Markdown notes, or a standalone Markdown file as Markdown, Word, or PDF. Folders and single files can become documents without timeline scene properties: review their contents and order, supply a title and author, and save the selection for reuse. See Manuscript export for source selection, reader presets, PDF proofs, and delivery review.
For PDF, choose a layout defining fonts, headers, chapter openers, and part dividers. Pandoc and LaTeX typeset the assembled document. Word requires Pandoc; Markdown needs neither tool.
Pandoc-based PDF export ships with the plugin, along with six bundled PDF layouts: four for novels, plus Screenplay and Podcast Script.
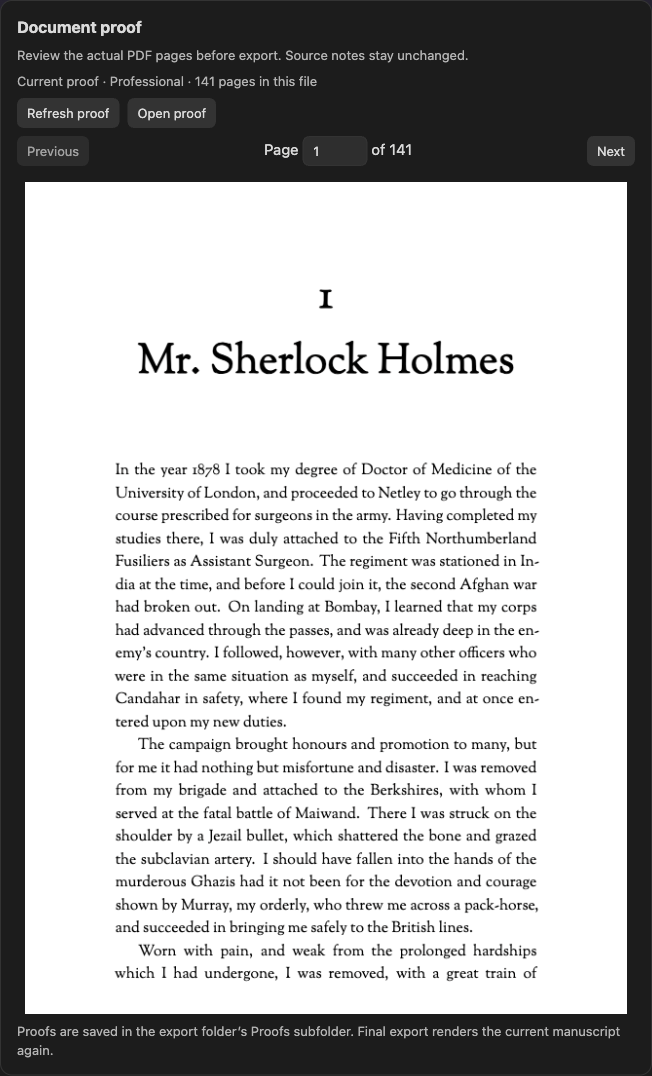
The PDF proof in the export panel: A Study in Scarlet in the Professional layout
Installing Pandoc and LaTeX
Section titled “Installing Pandoc and LaTeX”Install Pandoc and a LaTeX distribution:
macOS
- Pandoc — download the macOS
.pkginstaller from pandoc.org/installing and run it. - LaTeX — download MacTeX from mactex.org and run it. (Full MacTeX is large, ~5 GB; the ~100 MB BasicTeX package from the same page also works for exporting.)
- In Obsidian: Settings → Publish → Auto locate. It checks common installation locations and updates the saved paths.
Windows
- Pandoc — the Windows installer from pandoc.org/installing.
- LaTeX — MiKTeX (lets LaTeX fetch what it needs on first export).
- Settings → Publish → Auto locate.
For Word (DOCX), install Pandoc and use Auto locate to configure its path.
Alternative for terminal users: Homebrew on macOS also works — brew install pandoc and brew install --cask mactex-no-gui — as does the standalone Pandoc binary in ~/.local/bin. Auto locate probes all of these locations.
Template Catalog
Section titled “Template Catalog”Bundled templates live in Settings → Publish → PDF Styles. Each row shows a status pill (Installed / Not installed), a preview card, and buttons for Install and Duplicate.
Novel templates
Section titled “Novel templates”| Template | Structure | Best for |
|---|---|---|
| Basic | Standard double-spaced submission format | Sending to agents / editors |
| Standard | Book-style with contemporary serif body, running headers, chapter openers | A finished book look with simple chapters |
| Professional | Literary book style with refined typography | Polished prose fiction |
| Signature | Full book structure — Parts, chapters, part epigraphs, ornament scene breaks | Novels with parts and chapters |
Narrative Mode shows C and P placards at author-placed Chapter: and Part: markers. The selected PDF layout determines how those markers print. See Chapter and Part Placards.
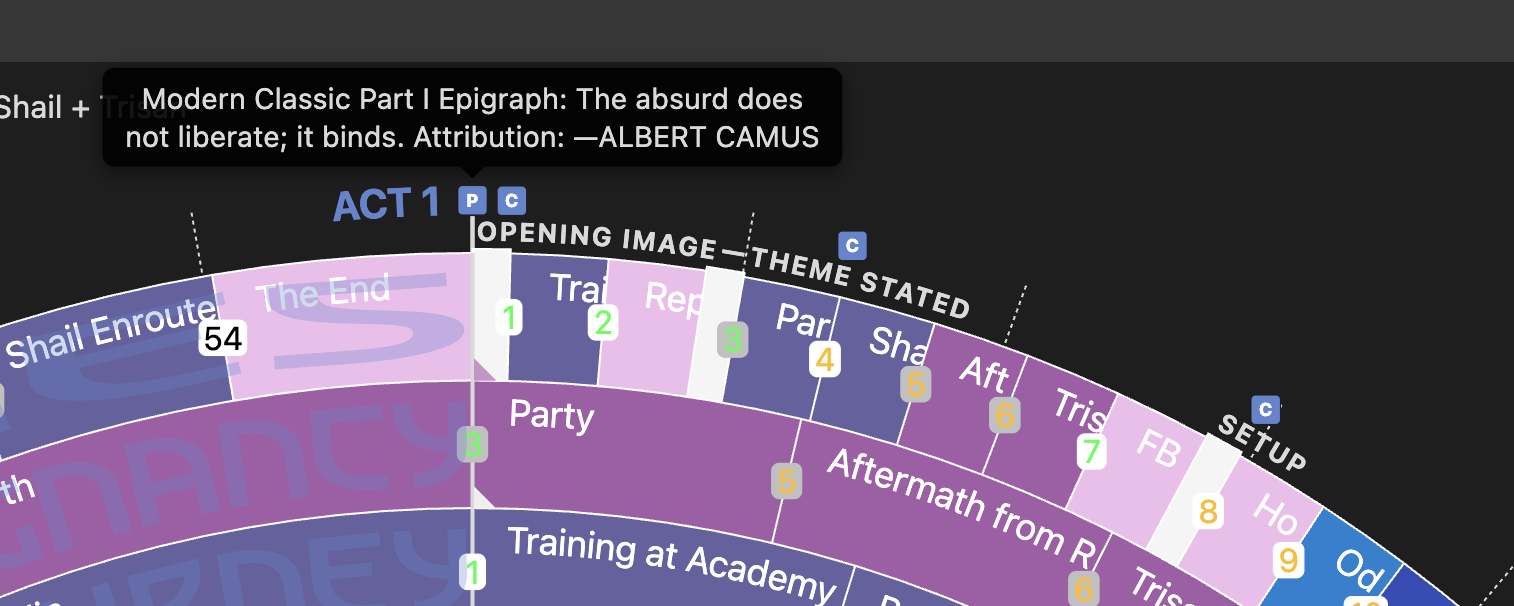
Narrative Mode perimeter markers — chapter starts, part boundaries, and combined Part/Chapter breaks
PDF layouts use the fonts listed below. Installing PDF styles copies bundled fonts into Radial Timeline/Pandoc/fonts/; Basic uses system Arial.
| Template | Font |
|---|---|
| Basic | Arial (system font) |
| Standard | Source Serif 4 |
| Professional | Sorts Mill Goudy |
| Signature | Latin Modern Roman |
Other formats
Section titled “Other formats”| Template | Format |
|---|---|
| Screenplay | Industry-standard screenplay |
| Podcast Script | Audio script with structured cues |
Installing a Template
Section titled “Installing a Template”- Open Settings → Publish → PDF Styles.
- Find the template you want in the list. If the pill says Not installed, click Install.
- The plugin copies the template’s
.texfile intoRadial Timeline/Pandoc/inside your vault and installs bundled fonts intoRadial Timeline/Pandoc/fonts/. The pill changes to Installed.
Only installed templates can be used for export. The export panel and Settings → Publish use the same template rules. If the saved layout isn’t available in a vault, the export uses Basic instead.
Book Details and Matter Pages
Section titled “Book Details and Matter Pages”Auto configure publishing is part of Core. It creates a Book Details note, optional inline LaTeX Book Pages examples, bundled PDF layout files, and required bundled fonts.
Fill in Book Details to generate title, copyright, dedication, epigraph, acknowledgments, author note, about the author, and other works pages directly.
Use a standalone LaTeX matter note only when you want a custom page body:
---Class: FrontmatterBodyMode: latex---Example body:
\begin{center}\vspace*{0.32\textheight}\begin{minipage}{0.72\textwidth}\itshape This optional front matter page is rendered as raw LaTeX.
\vspace{0.8em}\raggedleft\normalfont --- Attribution\end{minipage}\vfill\end{center}\newpage
Inline LaTeX pages use the content in their matter notes.
Auto configure publishing refreshes exact retired starter examples while preserving edited author files. If a matter note no longer matches the old bundled starter content, Radial Timeline treats it as author-owned.
Duplicating a Template
Section titled “Duplicating a Template”Every bundled template has a Duplicate button next to Install. Duplicating copies the .tex into your vault under a new name (e.g., rt_modern_classic-copy.tex), gives it a new display name (“Signature Copy”), and leaves the original untouched.
Use Duplicate to customize a copy of a bundled template. The copy shows the same preview card as the bundled template and accepts edits to its .tex file directly in your vault.
The Chapter: Field
Section titled “The Chapter: Field”The Chapter: YAML frontmatter field is how you tell the exporter “this is where a new chapter starts.”
Add it to the first scene note that belongs to each chapter:
---Class: SceneChapter: The Homecoming---Key behaviors:
- Scene notes only. Publishing reads
Chapter:from exported scene notes. - First occurrence wins. If five scenes share
Chapter: The Homecoming, only the first one starts the chapter — the rest flow inside it. - Case-insensitive.
Chapter,chapter,CHAPTERall work. - Numbering is automatic. You provide the title; the exporter supplies the number (
Chapter 1,Chapter 2, …).
Mark the first scene of each chapter.
You can add or clear chapter markers from the scene right-click menu in Narrative mode, or edit the Chapter: field directly in the scene note.
The Part: Field
Section titled “The Part: Field”Parts work exactly like chapters: a scene note carries a Part: field, and that scene opens the part.
---Class: ScenePart: true # numeral only — prints "I"------Class: ScenePart: The Crossing # numeral and title---Set Part: true when you want the numeral alone, which is what most books do. Give it a string when the part has a name.
Key behaviors:
- Scene notes only, same as
Chapter:. - Numbering is automatic and sequential. The first marked scene is Part I, the second Part II, and so on.
- Case-insensitive.
Part,part,PARTall work. - Clear a part from the right-click menu to remove its marker.
Mark the first scene of each part. Scenes before the first marker can form a prologue.
Ordering: Part → Chapter → Scene. A scene can open both a part and a chapter.
Add or clear part markers from the scene right-click menu in Narrative mode (Set part…), or edit the field directly in the scene note.
Act:places a scene in a timeline act;Part:starts a publishing part. Choose each structure to suit your book.
Signature prints Part divider pages. Check the Part preview card for the behavior of a custom layout.
Part Epigraphs
Section titled “Part Epigraphs”A Part page can carry a quote and an attribution. Set them in the active book’s layout options.
Settings → Publish → (your layout) → Part epigraphs
Entries pair with markers by position: the first entry prints on Part I, the second on Part II, and so on.
Because the pairing is positional, the two sides have to agree. The export checks report both directions:
- Fewer epigraphs than marked parts — some parts will print without one.
- More epigraphs than marked parts — add the intended Part markers or remove surplus epigraph entries.
Both appear on the PART preview card in the Publish panel and in the export checks before you generate a PDF.
Setting Up Signature
Section titled “Setting Up Signature”Signature is the most structured bundled template. It produces a book-style manuscript with:
- Part openers on their own page (with Roman numerals: I, II, III)
- Optional part epigraphs — a quote + attribution printed after each Part page
- Numbered chapter openers from your
Chapter:fields - Ornament scene breaks — scenes within each chapter flow as prose separated by a centered ornament
Here’s the full setup, step by step.
Step 1 — Install Signature
Section titled “Step 1 — Install Signature”Settings → Publish → PDF Styles → Signature → Install
The template file writes to Radial Timeline/Pandoc/rt_modern_classic.tex in your vault.
Step 2 — Mark your parts
Section titled “Step 2 — Mark your parts”Add a Part: marker to the scene that opens each part, from the scene right-click menu in Narrative mode (Set part…) or in the note. Parts are optional. See The Part: Field.
Step 3 — Add part epigraphs (optional)
Section titled “Step 3 — Add part epigraphs (optional)”Settings → Publish → Signature → Part epigraphs. Entries pair with your markers by position; see Part Epigraphs.
Step 4 — Add Chapter: markers
Section titled “Step 4 — Add Chapter: markers”Add a Chapter: value to the first scene of each chapter. See The Chapter: Field.
Step 5 — Assign Signature to the Novel format
Section titled “Step 5 — Assign Signature to the Novel format”Open the export panel (Command Palette → Manuscript export). In the template dropdown for Novel, choose Signature. The plugin remembers your last selection for next time.
Step 6 — Export
Section titled “Step 6 — Export”Command Palette → Manuscript export → choose your options → Export.
The exporter:
- Walks the timeline in narrative order.
- Emits a Part divider at each
Part:marker, with the matching epigraph when supplied. - Emits a Chapter opener every time a new
Chapter:value appears. - Emits scene prose separated by ornaments inside each chapter.
- Hands the assembled markdown to Pandoc, which produces a PDF.
Output goes to Radial Timeline/Export/ by default. You can change the destination in Settings → Advanced → Configuration → Export folder — type or pick any folder inside your vault, and the chip beside the field reveals it in Obsidian’s file explorer. Because exports are written through the vault, the folder must live inside the vault; to keep exports on an external drive (for example a Google Drive folder), point a sync/symlink at your chosen Export folder, or copy the generated files out after exporting.
Minimum viable Signature manuscript
Section titled “Minimum viable Signature manuscript”The smallest setup that produces a valid Signature PDF:
- Signature Installed
- At least one scene (anywhere) with a
Chapter:value
Add Part markers and epigraphs as your book requires. Pandoc, LaTeX, and the layout’s fonts must also pass export checks.
Scene Opener Heading Options
Section titled “Scene Opener Heading Options”Templates that have the Scene opener heading options capability let you choose how scene titles appear at the start of each scene. Available modes:
- Scene number — just the number (
3orScene 3) - Scene number + title —
3 — Opening Beat(default) - Title only —
Opening Beat(no number)
Find this in Settings → Publish → PDF Styles → [template] → + (expand) → Scene openers.
Signature separates scenes with ornaments. Use Basic, Standard, or Professional for labeled scene openers.
What Survives Export — the Content Contract
Section titled “What Survives Export — the Content Contract”If you’re migrating a manuscript that already carries Pandoc/LaTeX markup, this is the exact contract the exporter honors:
Preserved verbatim (PDF export):
- Inline LaTeX commands in scene text —
\newpage,\vspace{…}, custom macros. Scene bodies reach Pandoc as written and render as LaTeX. - Raw LaTeX environments (
\begin{…}…\end{…}), fenced code blocks, and display math ($$…$$) — preserved through export cleanup, including comment, link, and task-marker patterns inside them.
Always removed:
- Each note’s frontmatter: the
---…---block at the very top of a scene or matter note. A---block later in the scene is your text and goes into the manuscript as written, including scene breaks that hold dialogue such asKade: Get down!(Radial Timeline 8.0.4 and later). - Editorialist review blocks.
Removed only when the matching cleanup toggle is on: %%comments%%, %%query: author queries%% (and the older %%ai: spelling), HTML comments, links (label kept), callouts, block IDs, and (PDF/Word) task-list markers. In a Word export, author queries that are kept become margin comments (see Manuscript Export).
Document metadata: title and author always come from your BookMeta note. A YAML metadata block at the top of your old manuscript is not forwarded — use Settings → Publish → Advanced Pandoc instead:
- Custom Pandoc metadata — extra
--metadata key: valuepairs for custom/imported templates (lang,subtitle, or any variable your template reads). - Custom LaTeX preamble — raw LaTeX injected into the PDF preamble after the layout’s own setup, so your
\usepackage/\newcommanddefinitions win. This is the escape hatch for reproducing an existing Pandoc setup exactly.
Word (DOCX) export converts the same compiled Markdown via Pandoc using a bundled reference document (standard manuscript format). LaTeX commands are not rendered in DOCX output — they pass through Pandoc’s raw-LaTeX handling and are dropped from the Word file, so keep LaTeX-dependent formatting on the PDF path.
Troubleshooting
Section titled “Troubleshooting”Template shows “Not installed” after I clicked Install. The .tex file couldn’t be written — check that Radial Timeline/Pandoc/ exists and is writable.
Parts don’t appear in my Signature export. Parts emit where a scene carries a Part: field. Check that at least one exported scene has one, and that the value is not empty — an empty Part: is not a marker. If you are exporting a scene range, check a marked scene falls inside it.
I set a part but no badge appears on the timeline. Turn on Settings → Advanced → Configuration → Show part and chapter markers. The markers are saved either way; that toggle only controls whether the ring displays them.
Chapter numbering is wrong. The exporter numbers chapters by the order Chapter: values appear in the timeline. If a Chapter: value appears out of order, renumbering will reflect that. Check narrative order in Narrative Mode.
Epigraph fields are greyed out. Epigraphs are per-book. Make sure you have an active book selected before editing them.
Export checks say a bundled font is missing. Click Install fonts or Install all in Settings → Publish. Export checks identify the exact font each layout needs.
Headings set in Kalice, Claude Type, designed by Margot Lévêque.