
Timetable
Keep the book’s notes beside the wheel in an Obsidian Bases view. The Timetable shows scenes, story beats, sketches, and other manuscript notes in rows, with scene status, subplot membership, dates, durations, and synopses visible together. Scenes, beats, and sketches appear wherever they sit in the book folder; other notes appear only from the book folder’s top level, so feedback, cuts, and publishing material kept in subfolders stay out of the way. The Table view in the same file lists everything.
| file name | When· 2085 | Character | Place | Due | Words | Synopsis | ||
|---|---|---|---|---|---|---|---|---|
| Act 17 | ||||||||
| 0.01 | Opening ImageSave the CatThe keeper alone with the lamp, before anyone arrives. | |||||||
| A | The Lighthouse Keeper | Fri Apr 6 · 7PM2h | Mara | North Light | Oct 20 | 2,140 | Mara finds the lamp log torn out at the week she arrived. | |
| A+++ | Salt Ledger | Sat Apr 7 · 6:30AM45m | Mara, Ilse | Harbor Office | in 3 days | 1,650 | Ilse brings the harbor accounts and asks Mara to sign for oil she never received. | |
| 3A+++ | Fog Bell | Sat Apr 7 · 9PM1h | Ilse | Lantern Row | 4 days ago | 980 | The bell rings with no hand on the rope. | |
| – | The Keeper’s Brother | Maybe the keeper had a brother on the mainland? | ||||||
| 4Z+++ | Night Crossing | Mon Apr 93d | Teodor | The Strait | in 12 days | 3,420 | ||
| 5H | The Keeper’s Log | Tue Apr 10 · 8AM30m | Mara | North Light | Oct 2 | 1,210 | Mara reads the log aloud to the inspector. | |
Open the Timetable
Section titled “Open the Timetable”Click the table button in the timeline title bar, or run Radial timeline: Timetable open. On first use, confirm creation of the book’s .base file in Radial Timeline/Timetables/. It opens beside the timeline. Switching books on the timeline switches a following Timetable tab to that book, and the book button in the Timetable’s toolbar switches it from the table. Saga scope opens a combined table grouped by book and act.
The .base file is yours to customize. Change its columns, filters, sorting, or views in Bases. Radial Timeline preserves those choices. When a book’s manuscript folder changes, or a book joins or leaves the saga, it updates only the folder filter it wrote, wherever you have moved it, provided you have not replaced that filter yourself.
The toolbar
Section titled “The toolbar”Under Obsidian’s Bases toolbar, the Timetable has a row of its own:
- Quick Workspace opens a reference document next to the table. Choose Timetable and reference side by side, Timetable above reference, Timeline with timetable and reference, or Timetable above Canvas. The reference is the first outline document, or the first scene when the book has none. Timetable above Canvas opens the book’s subplot map, or offers to create one. Quick Workspace clears the main area for the Timetable and the views it opens. Pinned tabs stay open behind the Timetable, and your sidebars stay as they are.
- Radial Timetable switches the layout: Table for rows, Panels for cards with images, and Outline for the book in reading order beside your planning documents.
- Canvas map builds a subplot map of the book. See Canvas story maps.
- The book button names the book the table shows (Book: …) and switches it. A table that spans several books shows Choose book.
- Mode names the timeline mode the table follows. See Follow the timeline’s mode.
The +, lens and ✱ buttons below it add a sketch, light the table’s rows on the wheel, and open the Timetable keys.
Saved views
Section titled “Saved views”A .base file can hold several views, and Saved views in the Bases toolbar switches between them. Obsidian manages that list; Table, Panels and Outline change the layout of the Radial Timetable view itself. New files name their views Radial Timetable, Spreadsheet, Not on the timeline, Act board and Status board.
If you delete the Radial Timetable view or change it beyond repair, choose Restore Radial Timetable view from the ? beside Saved views, from the .base file’s menu, or run Radial timeline: Timetable restore a Radial Timetable view. It adds a fresh view with the recommended settings. Your other views, the Base filters and your notes stay in place; the file is reformatted and YAML comments in it are removed.
Read the rows
Section titled “Read the rows”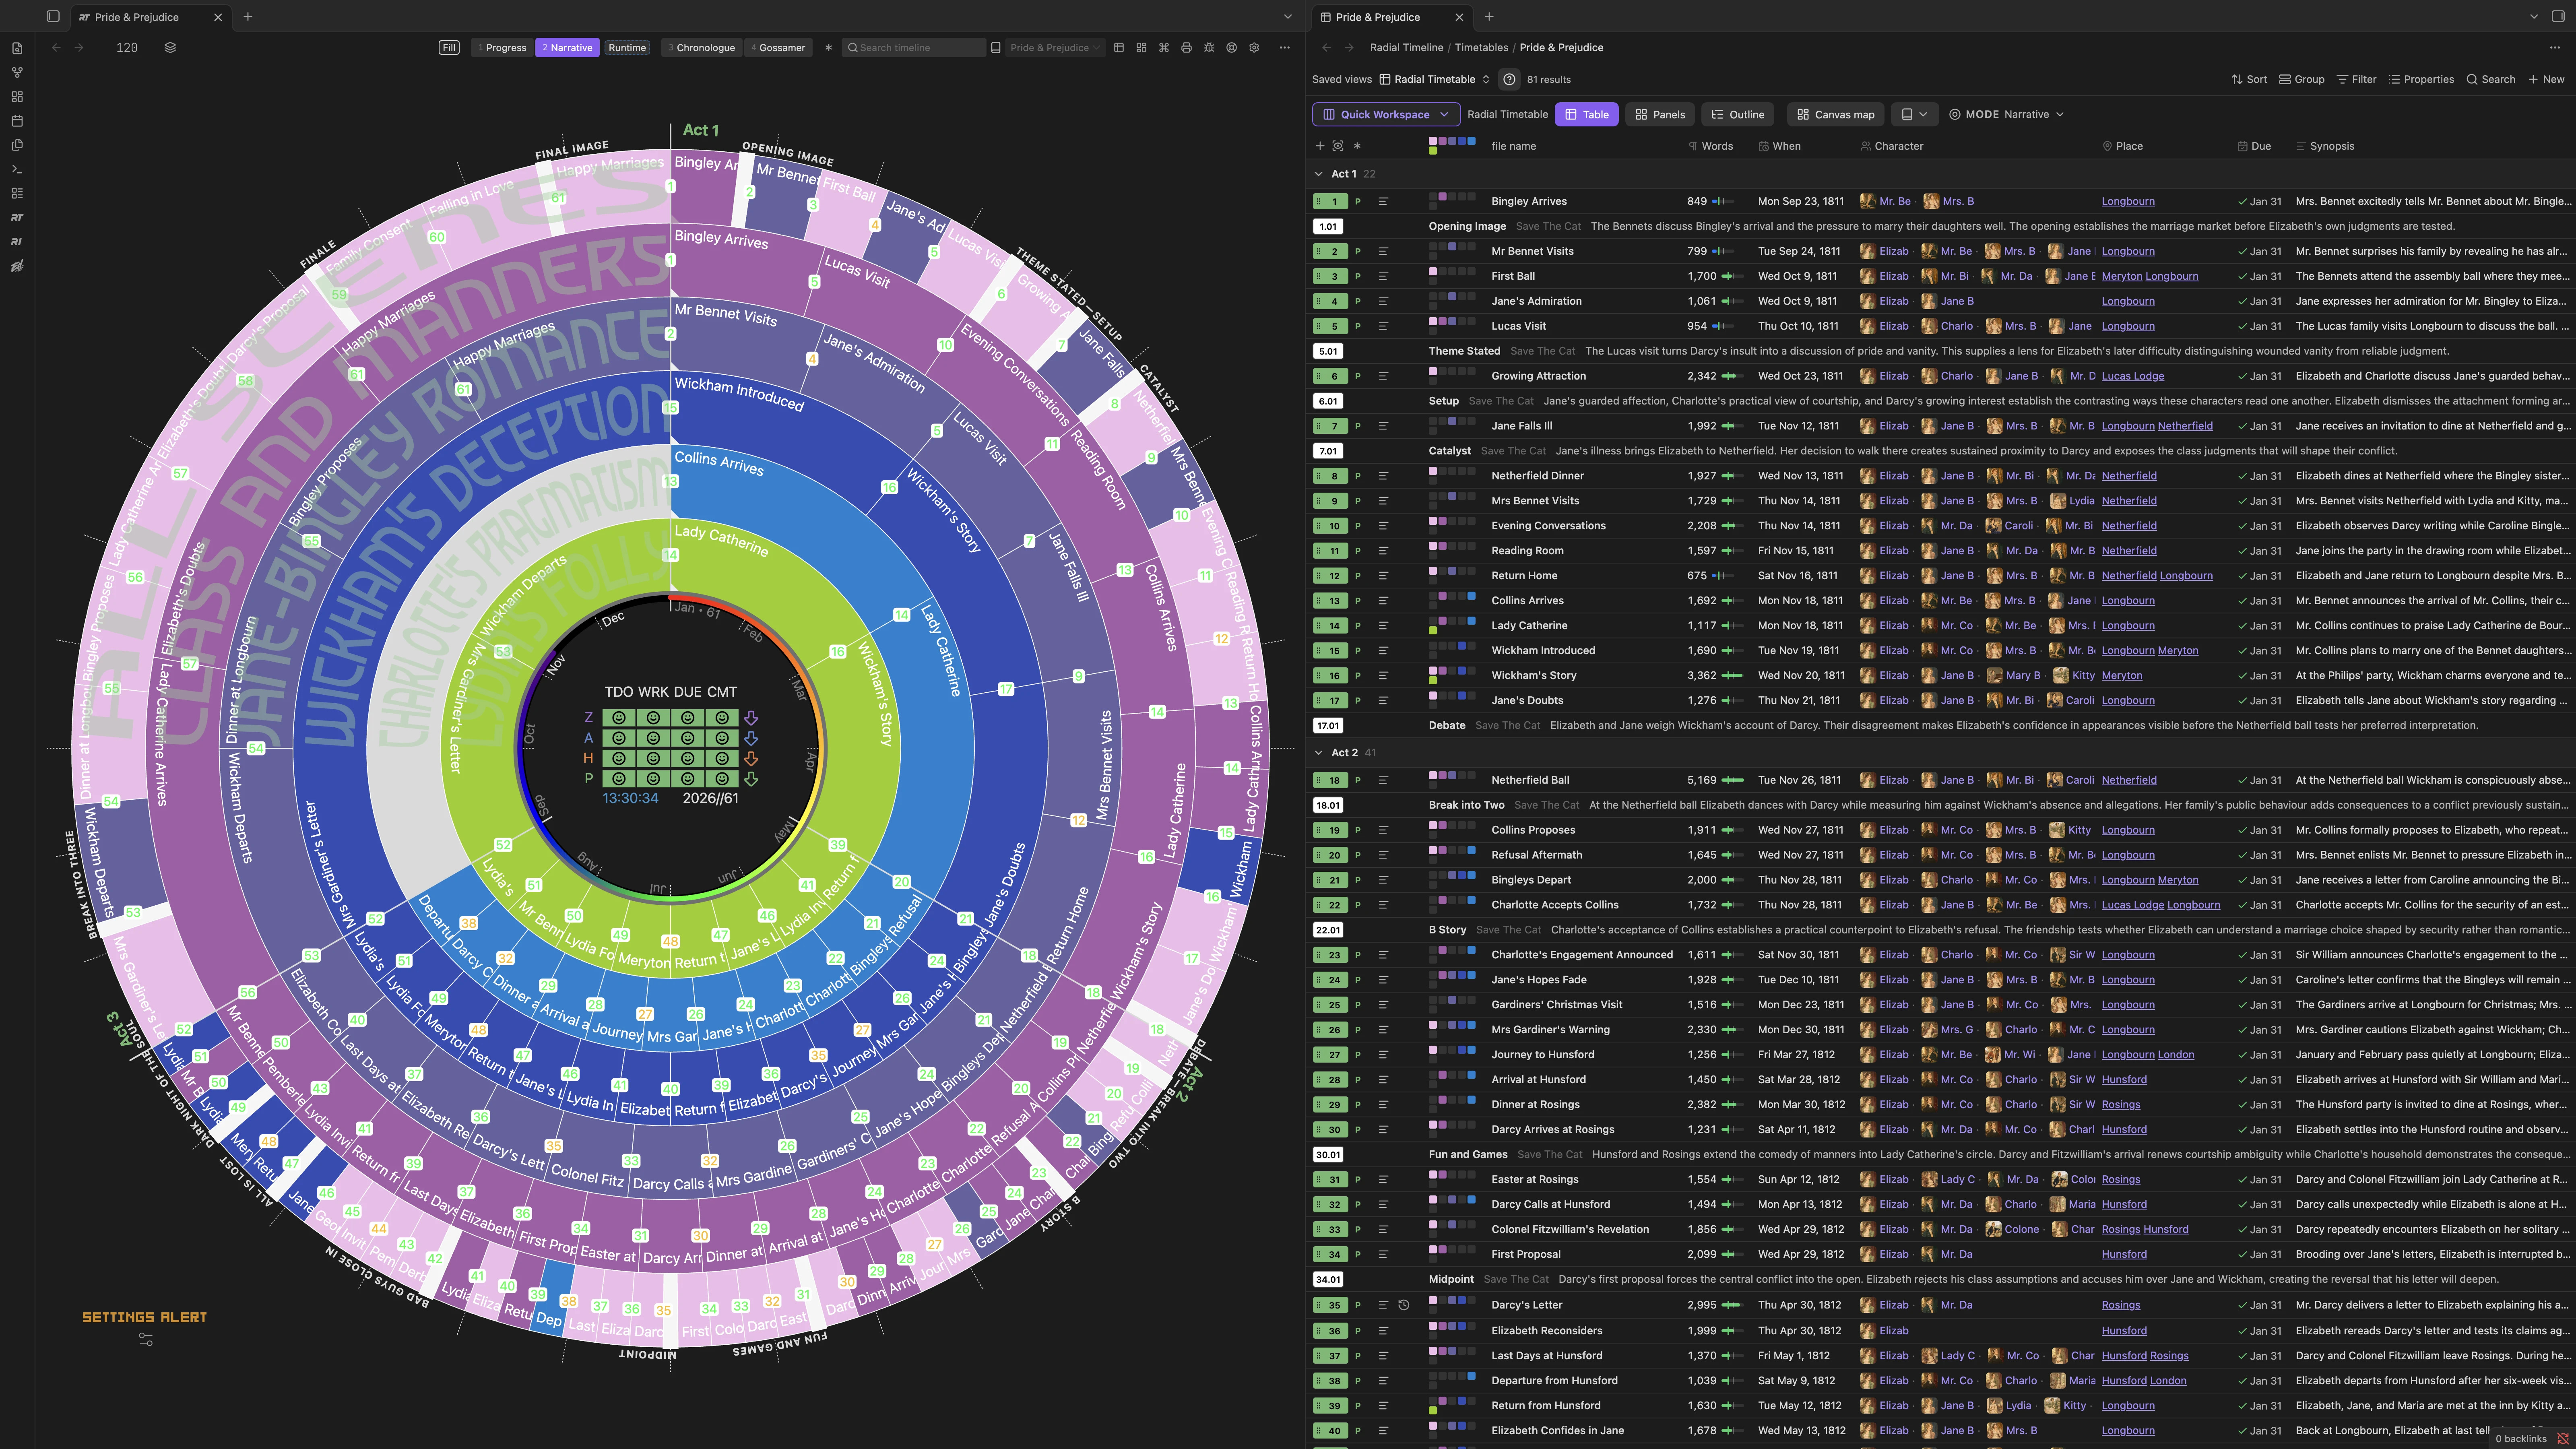
- Scene number: the number cell carries writing status and Publish Stage colors. Story beats have their own number treatment; sketches remain distinct from scenes. Click a scene’s number cell to set its Status or Publish Stage, or click a Status, Publish Stage, or Act cell for that property’s values. Marking a scene Complete sets Due to today, as it does from the wheel.
- Row controls: beside each number, each control in its own place so they line up down the table:
- the stage letter (Z Zero, A Author, H House, P Press) in its stage color, or a sketch’s chevron;
- a pencil while Pending Edits has text: hover it to read them;
- the Synopsis icon, on every row: hover it to read the Synopsis in full, or hold Shift for the Summary. It is fainter when the Synopsis is empty;
- a dot when Due is late (red) or within a week (amber). On hover, + and ++ take its place and advance Due by a day or a week until the scene is complete. A late Due moves at once, counting from today; a Due that isn’t late, or a missing one, asks first and names the new date. Each click builds on the last. Sketches and notes with no Class show Promote in this place.
- Rings: colored squares show subplot membership in the wheel’s ring order. Hover for the subplot names. Outlined squares can show a subplot planned for a sketch before it appears on the wheel. Rings per line controls wrapping.
- Properties: columns come from your scene property templates and respect your field-name mappings. Template columns carry an icon in their header, and a column narrower than its name shows only the icon, with the name on hover. Use Properties to show or hide columns; see Columns for their order, widths, and reset.
- When: a short date and time, such as Fri Apr 6 · 7PM. When every row shares a year, the year moves to the column header. While the Duration column is hidden, the duration sits beside the date (2h). Hover for the full date and the duration as written. The Alt calendar shows its planetary dates.
- Due: relative time near today: red 4 days ago when the scene isn’t complete, amber tomorrow or in 3 days within a week, plain text further out, and the short date beyond 30 days. A complete scene shows a check and its date. Hover for the full date.
- Words: the count with a small bar. Its tick marks the median scene of that scene’s book, and a full bar is twice the median. Hover for the ratio, such as 2,140 words · 1.3× the median (1,650).
- Runtime and Iteration: shown as badges with a timer and a repeat mark.
- Open queries: a marker identifies unresolved author queries in a note; hover to read them. On the wheel, the same scene shows a question bubble in each of its cells.
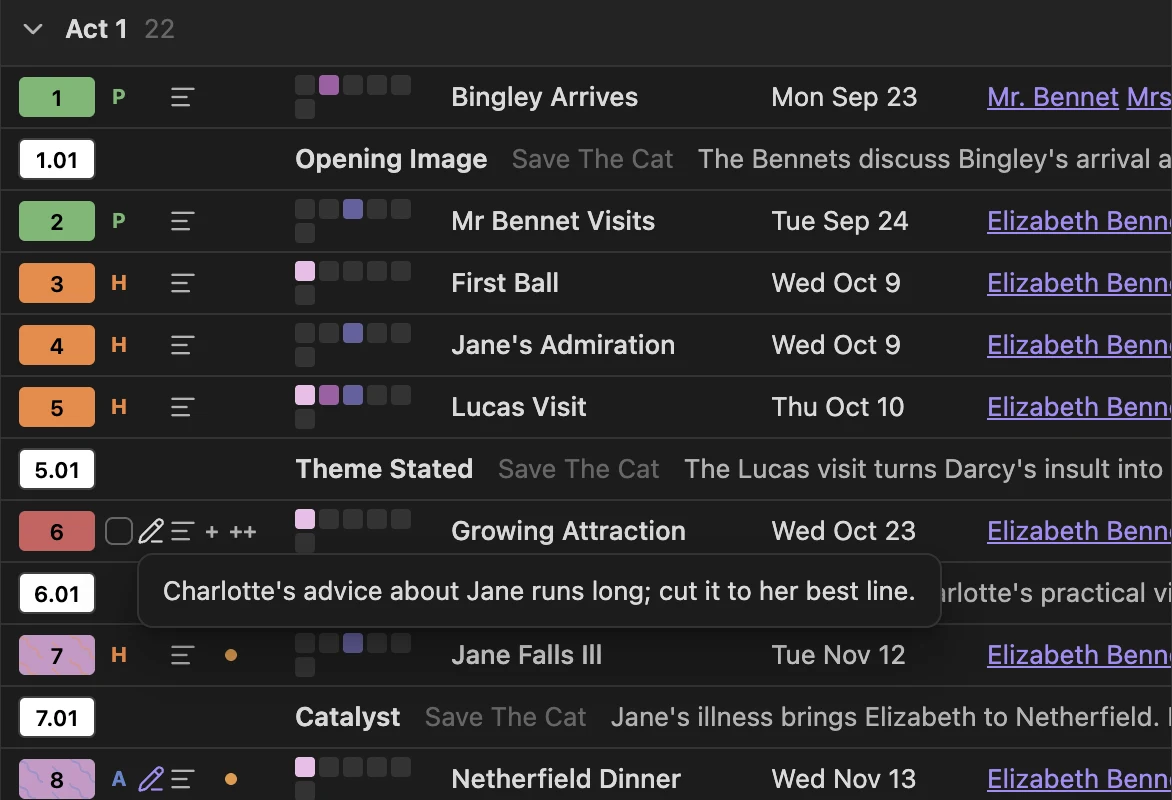
Row controls — hover the pencil to read Pending Edits; + and ++ advance Due
The ✱ button in the table’s corner opens the Timetable keys: what the row marks mean (including the row controls, + and ++, and the Words bar), what each click does, and the corner buttons. A badge names the mode the table follows, and a section on top explains what that mode changes (Chronologue’s date dividers and its Gap or Running time column, Progress’s act totals and overdue dates, Gossamer’s beats and scores). The timeline’s own ✱ key covers the wheel, including the open-query mark and the clicks that link to a Timetable.
Hover a scene row to highlight it on the wheel and give its row a solid leading accent and a muted color wash. The color follows the rendered scene: subplot color in Narrative and Chronologue, status or Publish Stage color in Progress, or the active column coloring. Hover a scene on the wheel to light its row in that specific cell’s color; hold Shift as you hover to bring the row into view, centered, as Canvas does with its cards. A plain hover never scrolls, so a pointer or a dragged file crossing the timeline leaves Table, Panels, and Outline where they are. Click a scene row to open its note; Shift-click brings the timeline forward and highlights that scene. Right-click a scene row for the timeline’s scene menu.
Hold Shift while hovering a cell its column cuts off, such as a long Synopsis, a list of characters, or a beat’s purpose, to read its full text in a panel under the cell. Letting go of Shift, leaving the cell, or scrolling puts it away.
The table and the wheel point at each other. The note open in an editor is marked in the table. Clicking an act label on the wheel (a book label in Saga scope) shows that act in the table, expanding it if collapsed. Spotlighting a ring in the subplot key fades the rows outside that ring.
Columns
Section titled “Columns”A new Timetable lists When, Character, Place, Due, and Words after the name, then the rest of your scene template in its order, with Synopsis last. Duration, Chapter, Runtime, and Iteration start hidden; When shows the duration. Once a book has five scenes, a column that fewer than half of them fill starts hidden too, though When and Synopsis always show. Every hidden column is one click away in Properties.
- Fit to content: right-click a column header and choose Fit to content, or Fit every column. Double-click a column’s resize handle to fit that column. Fitted widths stay between 48 and 300 px and are saved like a dragged width.
- Automatic fit: a column you haven’t sized fits its header and cells while the table is open. It grows as you edit but shrinks only when the table reopens, and it isn’t saved to the
.basefile. - Long text: Synopsis, Summary, and Pending Edits keep their width and never fit automatically.
- Reset columns to recommended: in the column header menu, or run Radial timeline: Timetable reset columns to recommended. After you confirm, that Timetable view gets the recommended columns for its scenes and loses its saved widths. Filters, sorts, grouping, and the file’s other views stay as they are.
Time references within a scene
Section titled “Time references within a scene”Expand the reference control beside a scene number to see its dated passages, then click a child row to open the passage or Manage time references to edit the list. See Time references for the YAML format and how child rows connect to the Chronologue wheel.
Follow the timeline’s mode
Section titled “Follow the timeline’s mode”The Timetable draws itself in the timeline’s mode, and Mode in its toolbar shows which. Choose a mode from its menu to pin the table to it; a lock marks a pinned mode, and Follow the timeline releases it. While the timeline is in the pinned mode, the table shows what the timeline shows, such as Chronologue’s Shift gaps or Narrative’s running times; pinned to any other mode, it shows that mode’s plain order. A sort set in the Bases toolbar still wins over the mode’s order. The Outline layout always follows narrative order.
| Timeline mode | What the table shows |
|---|---|
| Narrative | Rows in manuscript order. The Runtime view adds a Running time column: the runtime through each scene in reading order. |
| Chronologue | Rows in story order with a divider for each day; beats are left out, as on the wheel. Shift adds a Gap column (time since the previous dated row), and the Alt calendar shows dates, days, and gaps in the planetary calendar. |
| Progress | Each heading counts complete scenes, words, and overdue scenes; overdue Due cells stand out. |
| Gossamer | Beats come forward with their latest score for the selected signal, its change since the previous run, the expected range (flagged when a score is outside it), and the justification. Other rows recede. |
Light up the table on the timeline
Section titled “Light up the table on the timeline”Turn on the lens in the Timetable’s corner, or as a view option saved in the .base file. The table’s scenes stay lit on the wheel and the rest recedes, as in Chronologue’s Shift mode: scenes outside the table, their numbers and titles, void cells and spokes fade, and the subplot ring titles hide. Hovering a receded scene still shows it. A pill names the view, with a button that turns the lens off. Any Bases filter becomes a pattern on the wheel, so a saved view is a saved lens.
A view with a filter of its own (This view in the Filter menu) turns the lens on by itself. Turning the lens off holds for that filter; a new or changed filter lights it again, and removing the filter returns the lens to its toggle. A new filter takes the lens from any other table.
Color the timeline by a column
Section titled “Color the timeline by a column”Right-click a stored scene-property column header to color the timeline’s scenes by values such as Character, Place, Narration, Type, or your own categories. Every list member is available, including a character never listed first. Unfilled template fields such as {{Character}} count as no value.
The timeline takes its colors at once: up to eight categories, starting with the eight that have the most scenes. Edit key, in the key above the timeline, chooses others, with a search for a long list. Other scenes stay muted. The key shows each category’s scene count and states when only part of the column is colored. A scene takes the color of its rarest colored category, so a character in nearly every scene leaves room for the others.
Click names in the key to narrow the timeline and fade nonmatching Timetable rows. Buttons beside the scene count set how the names combine, worded for how many you’ve picked:
| The scenes with | One name | Two names | Three or more |
|---|---|---|---|
| Every name | With … | Both present | All present |
| Any of them | Either present | Any present | |
| None of them | Without … | Neither present | None present |
| Those names and nobody else | Alone together | Only these |
A list column starts on Both present, so picking two characters shows the scenes they share, anywhere in their lists. Place starts on Either present, as does a column with one value per scene, which offers only Either present and Neither present for two or more names. Without and Neither paint their scenes in the first name’s color. A scene with nothing in the column appears in none of these. Clear selection restores all categories in the chosen palette without turning coloring off.
When starts with month groups, coloring the eight with the most scenes; pick months in Edit key to choose your own. Edit key also offers day, year, and a custom date range with inclusive start/end days and separate before/after groups. Due groups scenes into Overdue, Today, Next 7 days, Later, Completed, and Not set. Edit key lists every Due and range group, empty ones included, and each kept group colors as scenes reach it: a scene that turns overdue tomorrow takes the Overdue color, and every group keeps its own color. A completed scene’s Due is its completion date, so it belongs in Completed rather than Overdue. Invalid dates are shown separately. A scene sits in one date group, so choosing April and June shows the scenes in either month. Date-compatible custom properties can use the same grouping options.
Stop coloring, in the header menu or the key’s close button, restores the status and subplot colors and clears the selection. Palette choices, date groups, selections and how the names combine are saved with the Timetable view. Cancel in Edit key leaves the saved view unchanged. One table colors the timeline at a time.
Edit many rows at once
Section titled “Edit many rows at once”Each scene, sketch, and not-yet-promoted row has a checkbox, which takes the stage letter’s place on hover. Once a row is picked, every row shows its checkbox until the selection clears. Shift picks a range and Esc clears the selection. While rows are picked, a bar under the table sets Status, Stage, or Act on all of them, adds them to a ring or removes them from one, or promotes the ones that aren’t scenes yet. Status and Stage follow the wheel menu’s rules, so Complete sets Due. Ring changes come with one notice and one Undo for every note changed.
The reading pane
Section titled “The reading pane”Notes you open from the Timetable appear in a pane below the table, so the wheel, the table and one note sit side by side. While a Timetable is showing, scenes clicked on the wheel open there too, and their row is marked in the table.
- The first note splits the table downward. Each later note replaces the one in the pane, and the pane’s back and forward buttons step through the scenes you visited. Drag the divider to give the table or the note more room; you can also drag the pane above the table.
- A note that is already open somewhere is shown where it is, not opened twice.
- Cmd-click (Ctrl-click on Windows and Linux) opens a new tab instead.
- Pin the note in the pane to keep it: the next note opens in a tab beside it.
- The reading pane is used only while a Timetable is showing.
Panels
Section titled “Panels”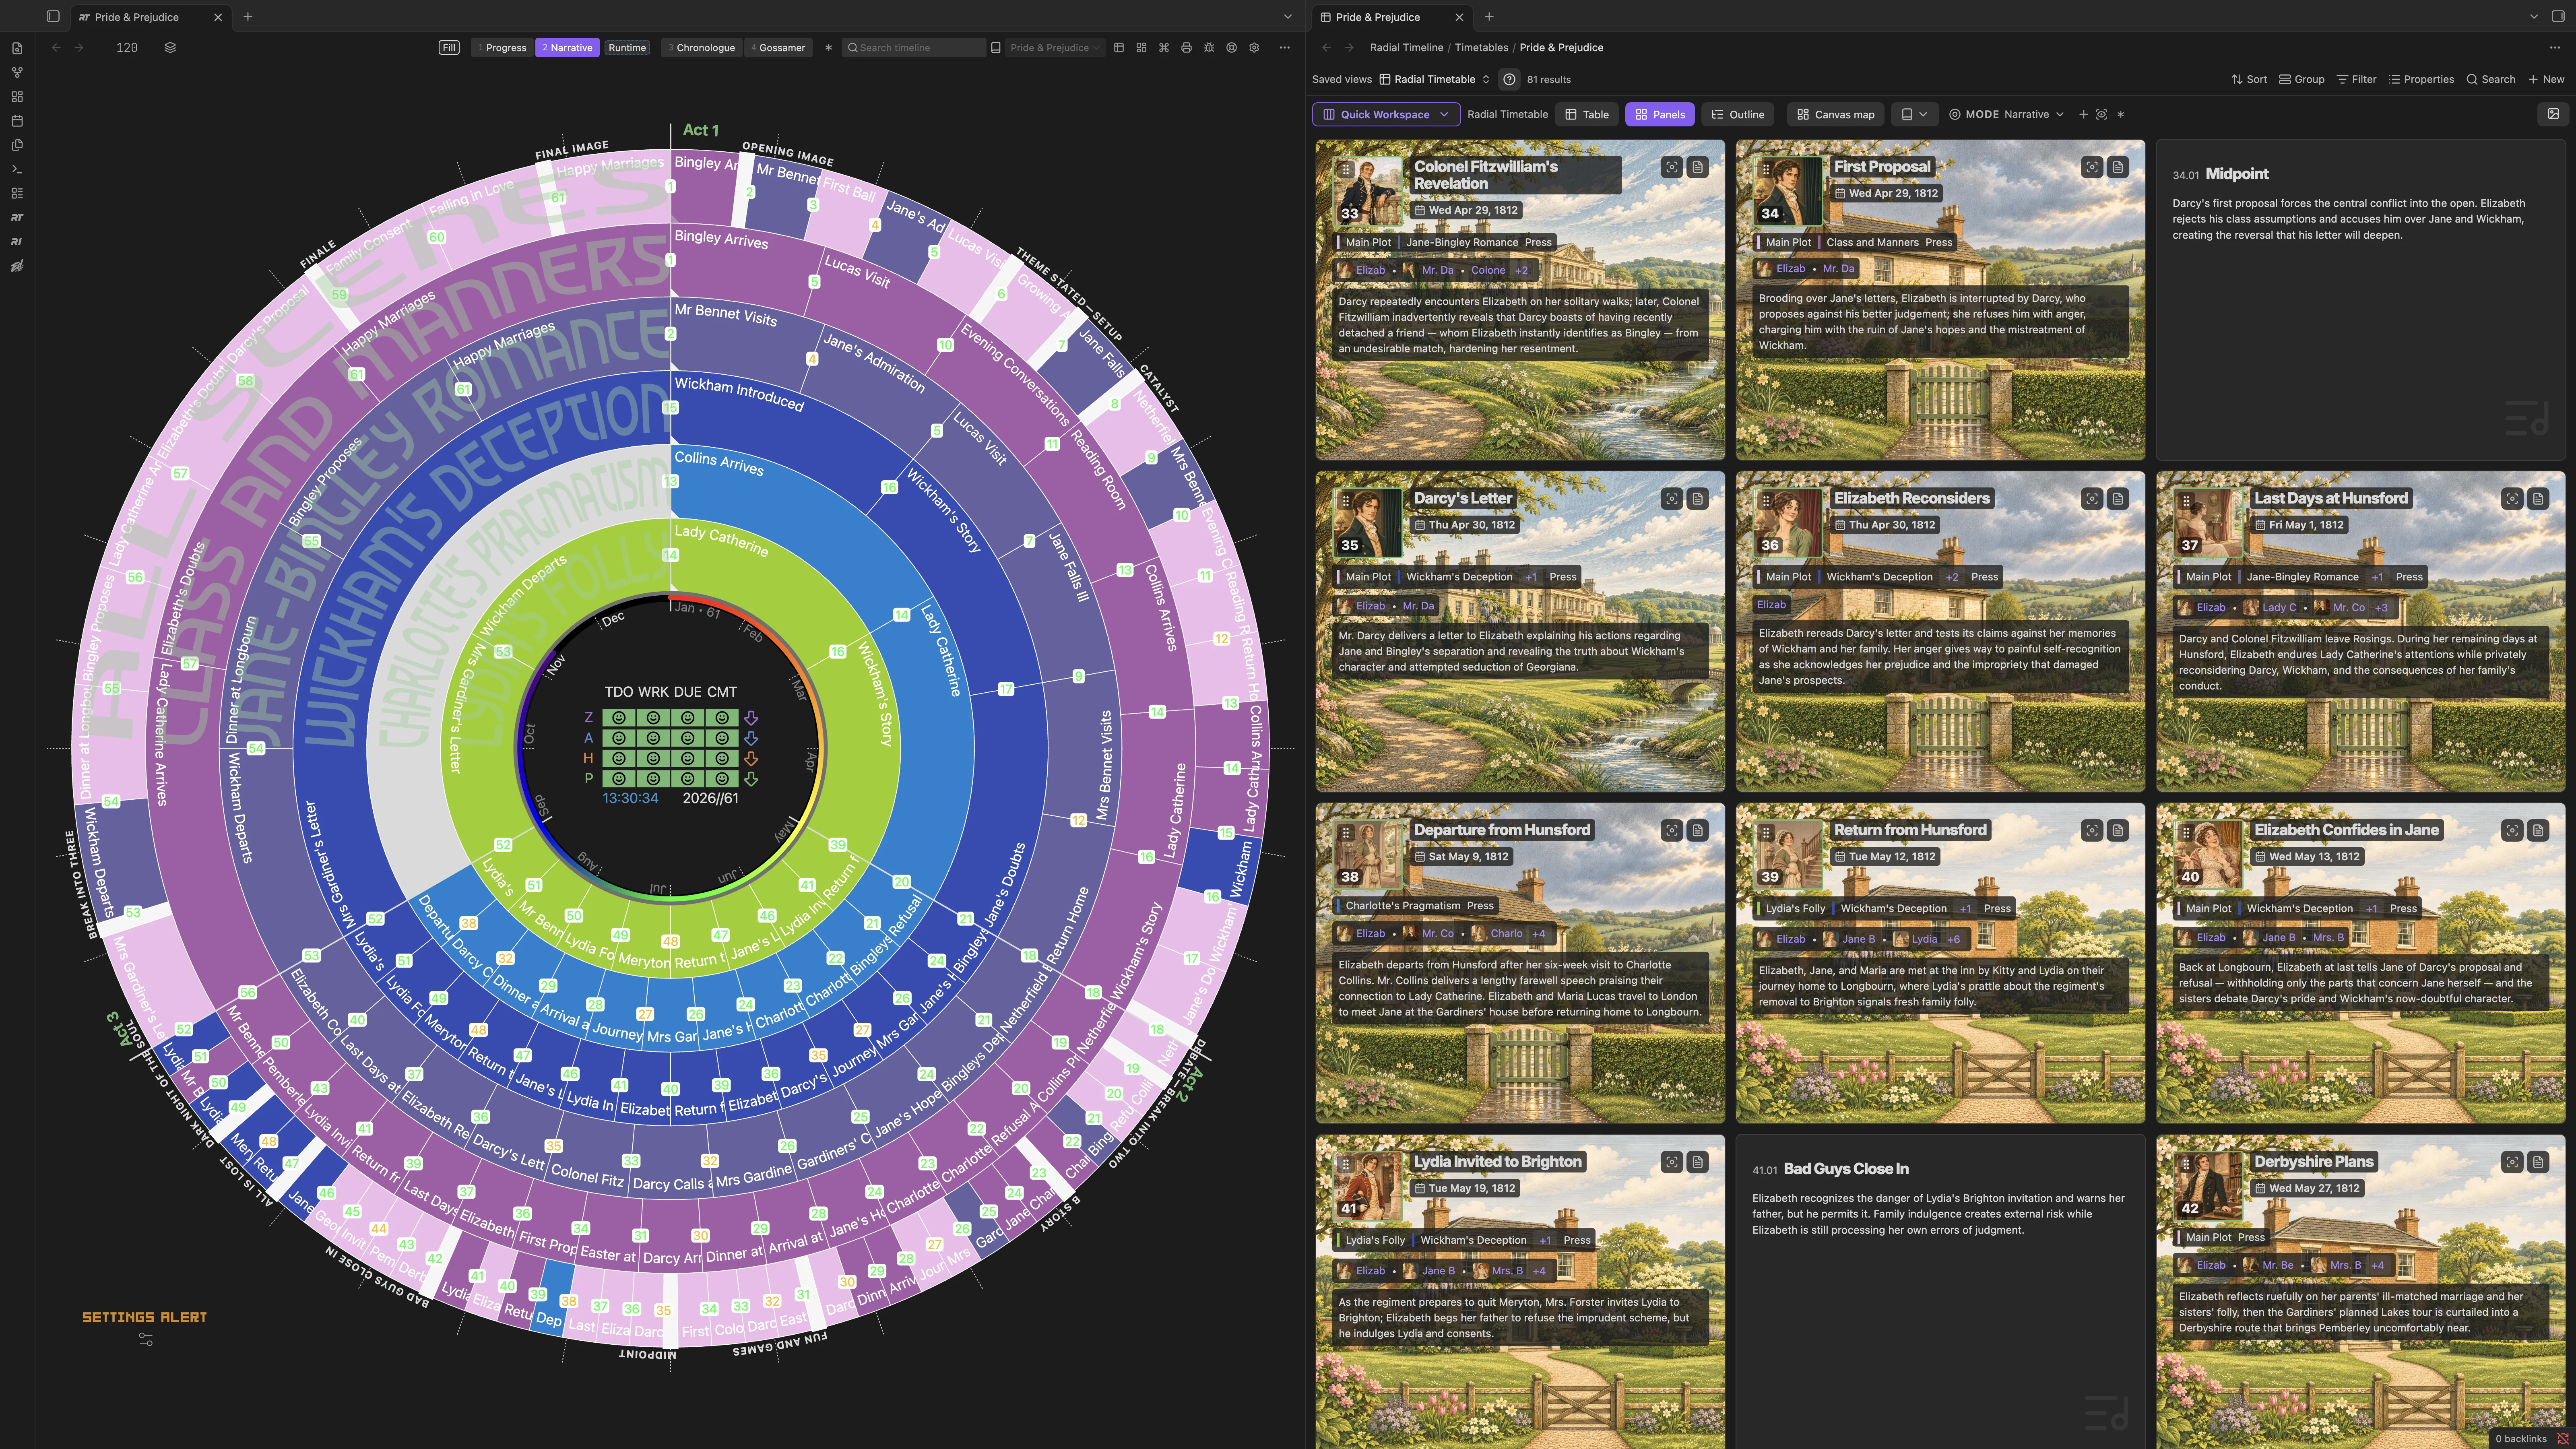
Panels shows each scene, beat and sketch as a card, act by act: number, title, date, rings, characters and the synopsis, with an image beside them. Beats show their purpose; sketches show their text, and Expand sketch opens the rest.
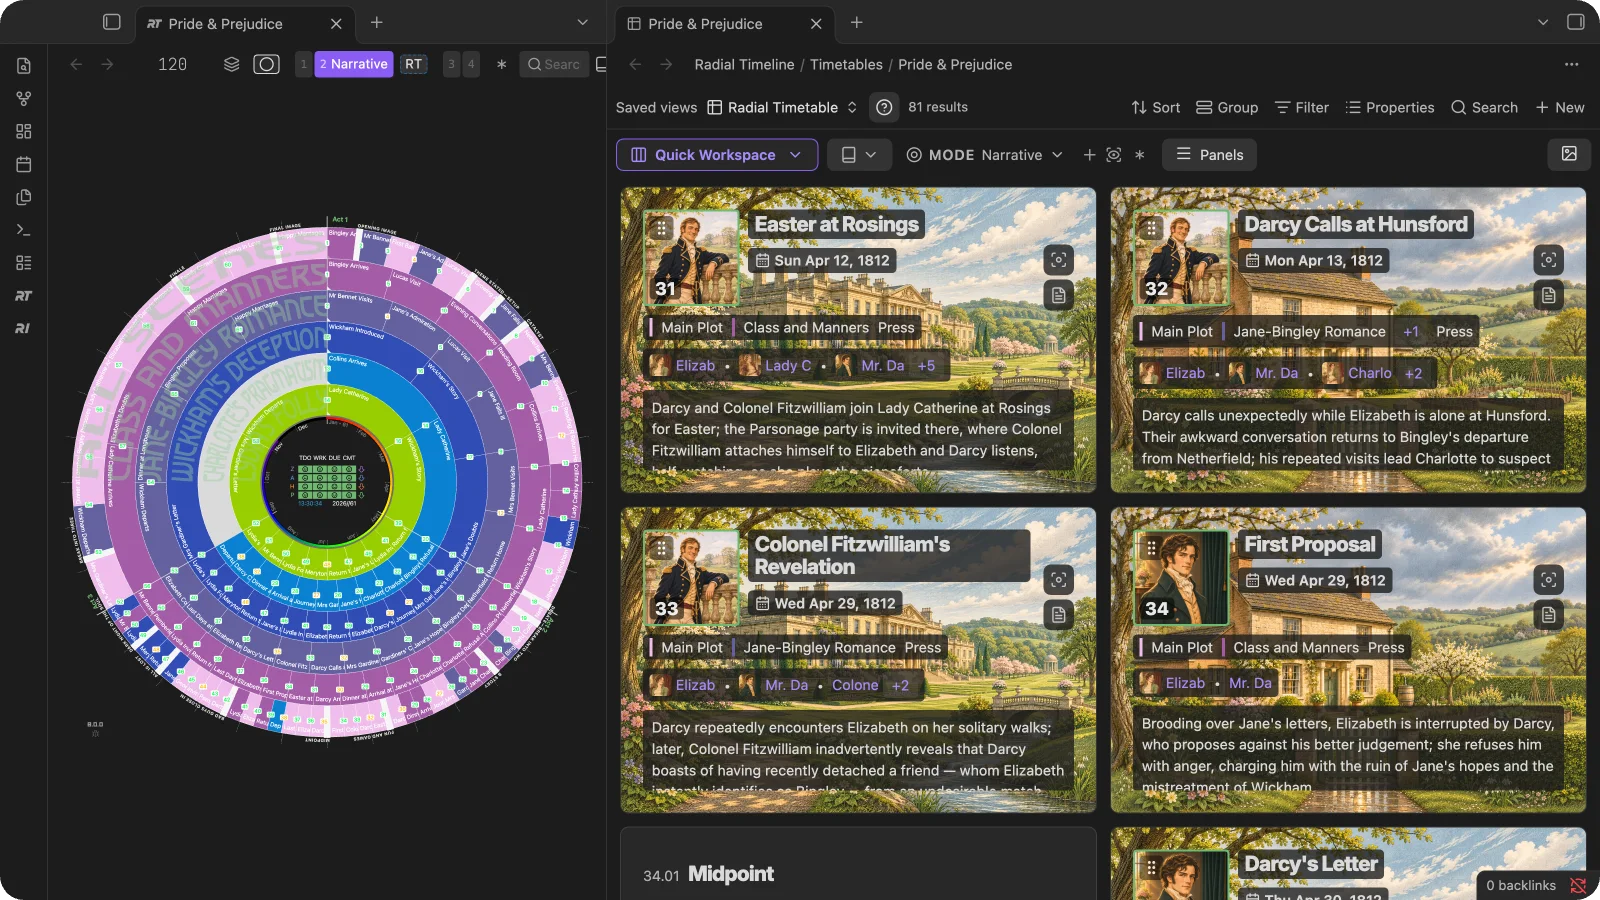
- Image chooses what each card shows: Character (a portrait of one of the scene’s characters, chosen by Character selection), Place, Place + character (the place and the character side by side, or whichever one the scene has), Place background + character (the character’s portrait over the place, with the card’s text on a backing you set with Text backing: Subtle, Balanced or Strong), or None. A character’s or place’s picture comes from its note’s
Image, or else a picture named after it; see Images for Timetable Panels. - Character selection decides whose portrait a card shows, among the scene’s characters who have one: Most distinctive (the default, the character who appears in the fewest scenes of the book, so each card tells you something), First listed, Second character, POV character, or Balanced variety (like Most distinctive, but avoids showing the same face on two cards in a row).
- Card images, the picture button on a card, says where the card’s portrait and place come from (Portrait: from Elizabeth Bennet’s note, Place: picture named Longbourn 2.webp), and changes them for that card only: pick one of its characters, Next portrait to step through a character’s numbered portraits, Choose portrait…, or Choose place image…. Return to automatic images hands the choice back.
- Image sizing: Fill crops the image to the card, Fit shows all of it. Set image focus, on a card, picks the part of the image that stays in view: click the image or use the sliders, or Center to reset. A focus point belongs to the picture, so Canvas cards crop it the same way.
- Portrait shape: Square or Landscape.
- Panel size: Small, Medium or Large.
- In a narrow pane these choices fold into Image settings, the image button in the toolbar, under Image combinations, Background treatment, Character selection, Image sizing, Portrait shape and Panel size.
- Synopsis: click it, or Add synopsis on a card without one, to edit it in place, then Save. If the note changed elsewhere meanwhile, your edit stays in the field so you can copy it.
The layout and panel size are saved with the view. The image choices (Image, Text backing, Image sizing, Portrait shape and Character selection) are shared with Canvas cards and apply across your books, and a card’s own picture choices stay with that note.
Outline
Section titled “Outline”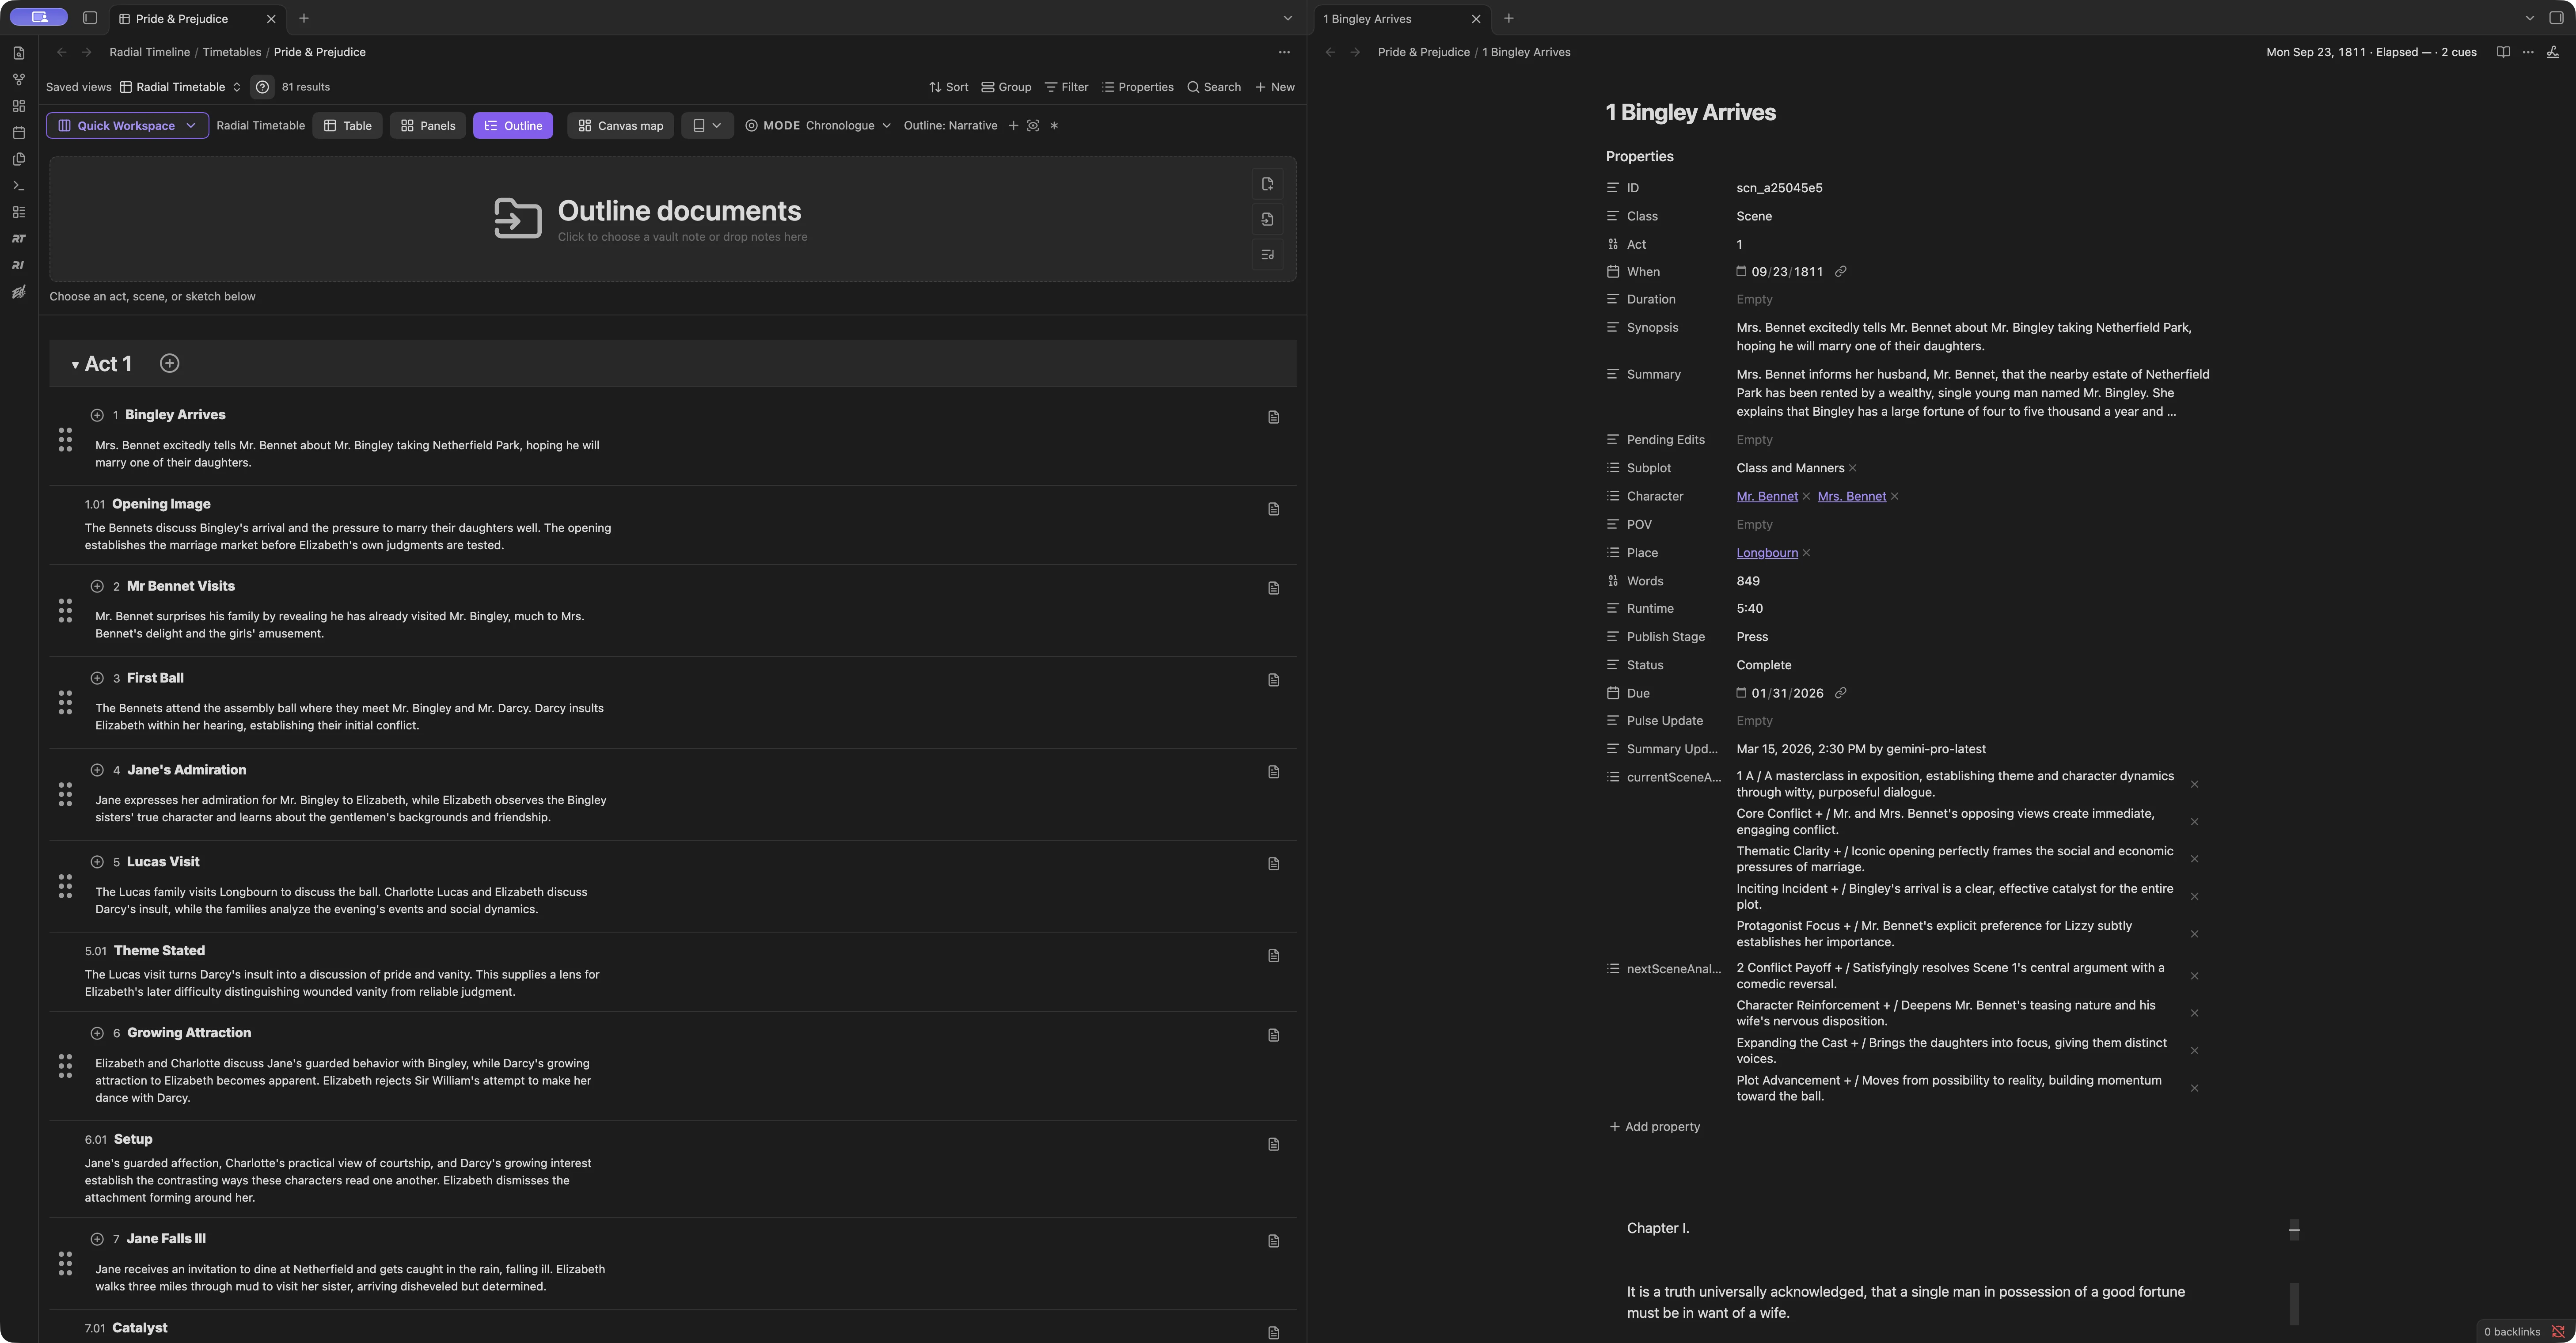
Outline lists the book act by act in narrative order, whatever mode the timeline is in, with each scene’s synopsis. Show beats adds the story beats between them.
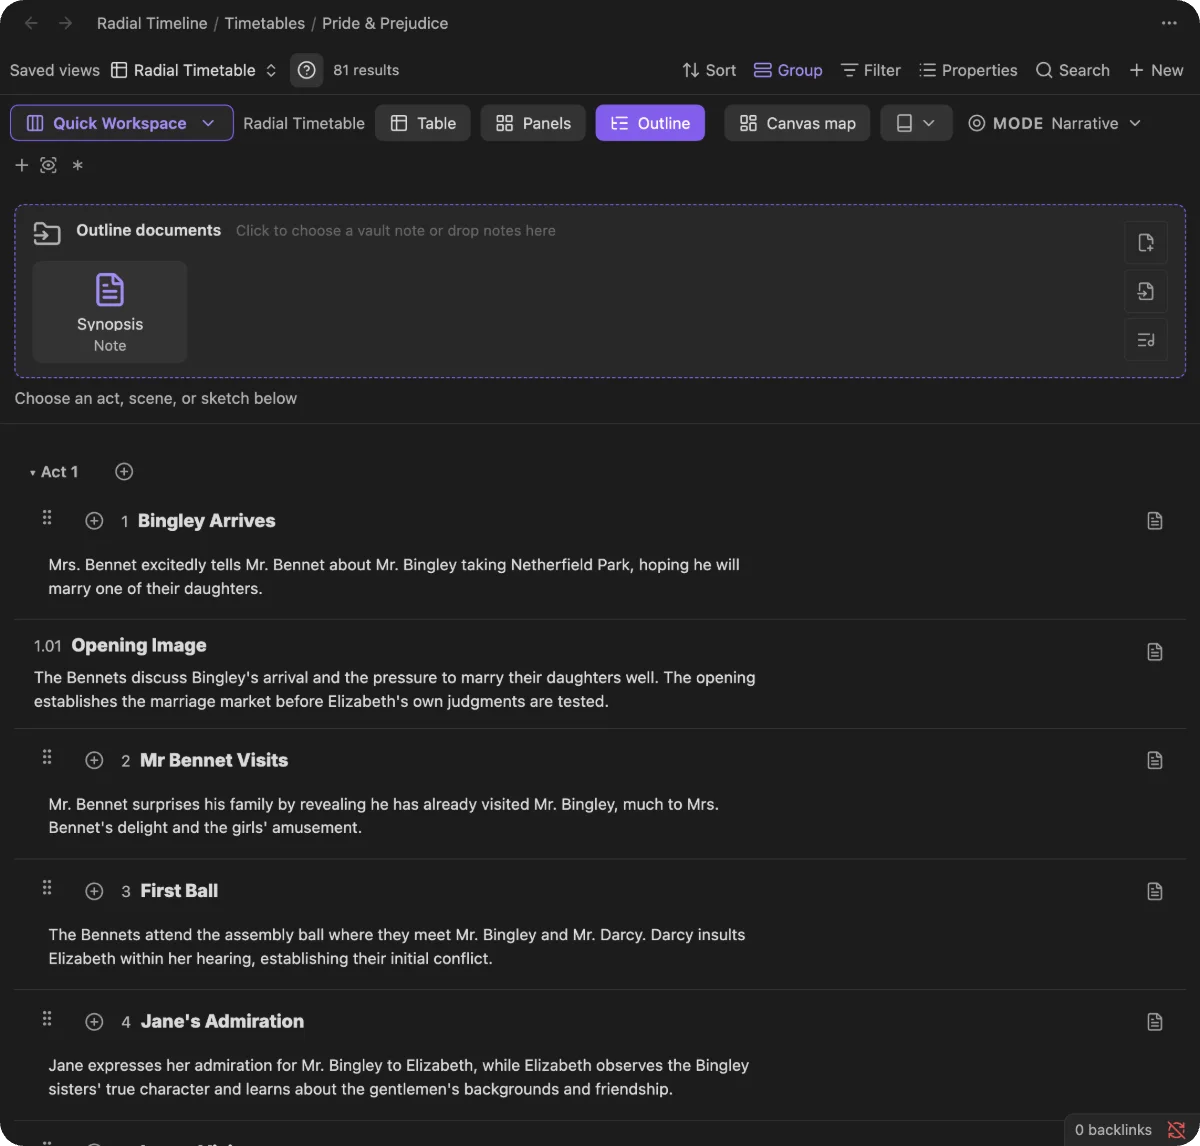
The Outline documents tray on top holds your planning material. Notes with Class: Outline in the book folder appear there by themselves. Attach any other note by clicking the tray, dropping notes on it, or with Attach document. Remove document link takes one off the tray without changing the note. Click a document to open it as the reference in a Quick Workspace.
To turn a planning document into sketches:
- Choose where it goes. Click a scene, sketch or act in the outline. The line above the list confirms the spot (Insert after: …, or the end of an act).
- From a selection: select text in the open reference document, then click Add selection as sketch. You can also drop selected text, a scene or a sketch onto a row, or onto an empty act. Place new sketch after this on a row starts an empty one there.
- From headings: Create sketches from this document on a document opens Create sketches from outline. Pick the heading level that marks each sketch, and the level of headings named Act 1, Act 2 and so on if the document has them. Review each entry’s title, text and act, then Create sketches. The sketches link back to the document in their Source property, and the document stays as it is.
Place scenes and sketches from the table
Section titled “Place scenes and sketches from the table”Each scene in Table and Panels has a grip. Drag it onto another scene to place it just before that scene. In Narrative this changes the manuscript order, as dragging on the wheel does, and dropping on an act heading moves the scene to the end of that act. In Chronologue it opens the same placement as dragging in time. The grip works for the timeline’s active book, in Narrative or Chronologue, with no sort set in Bases and no alternate view on (Runtime, Shift or Alt). Otherwise it explains what to change.
Sketches have a grip too, in Narrative. Drop a sketch on a scene to place it after that scene, on another sketch to sit beside it, or on an act heading to move it to the end of that act. An empty act shows Drop a scene or sketch here. When you move a scene to another act and sketches are placed after it, Move attached sketches? asks whether they Follow scene or Keep in current act. A sketch whose scene went missing, or moved to another act, shows a warning with the same choices.
Canvas story maps
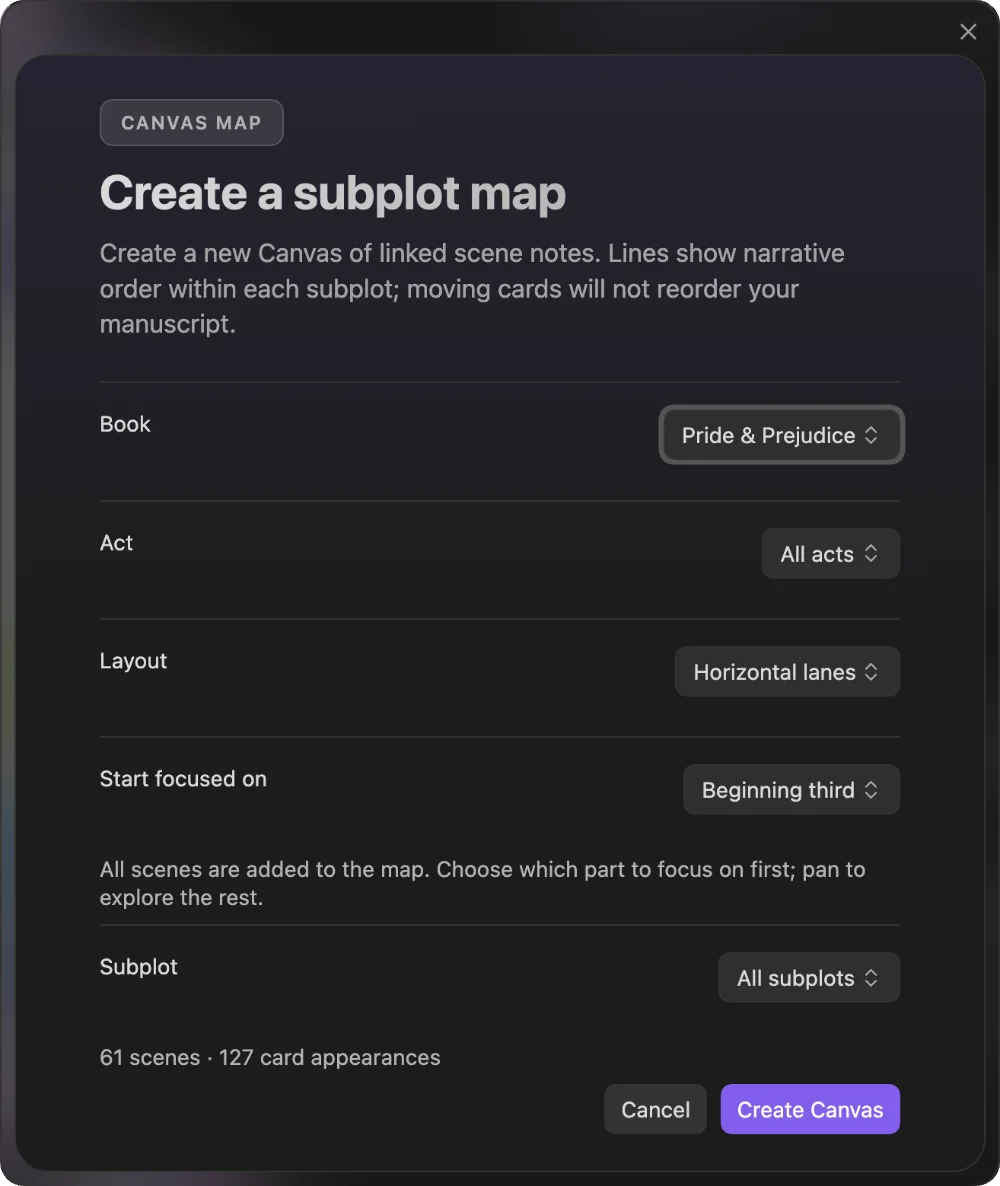
Section titled “Canvas story maps”Canvas map in the Timetable toolbar, the Canvas icon in the timeline title bar, or Radial timeline: Canvas create subplot map opens Create a subplot map. Choose the Book, an Act or All acts, a Subplot or All subplots, and a Layout: Horizontal lanes, Vertical lanes, or Single story line. Start focused on picks the part of the book the map opens on (Entire selection, or the beginning, middle or final third); every scene is on the map either way. Create Canvas saves it in Radial Timeline/Story Maps/.
Each scene appears in every subplot lane it belongs to, as a card linked to its note, and lines connect the scenes of a lane in narrative order. Moving cards does not reorder your manuscript.
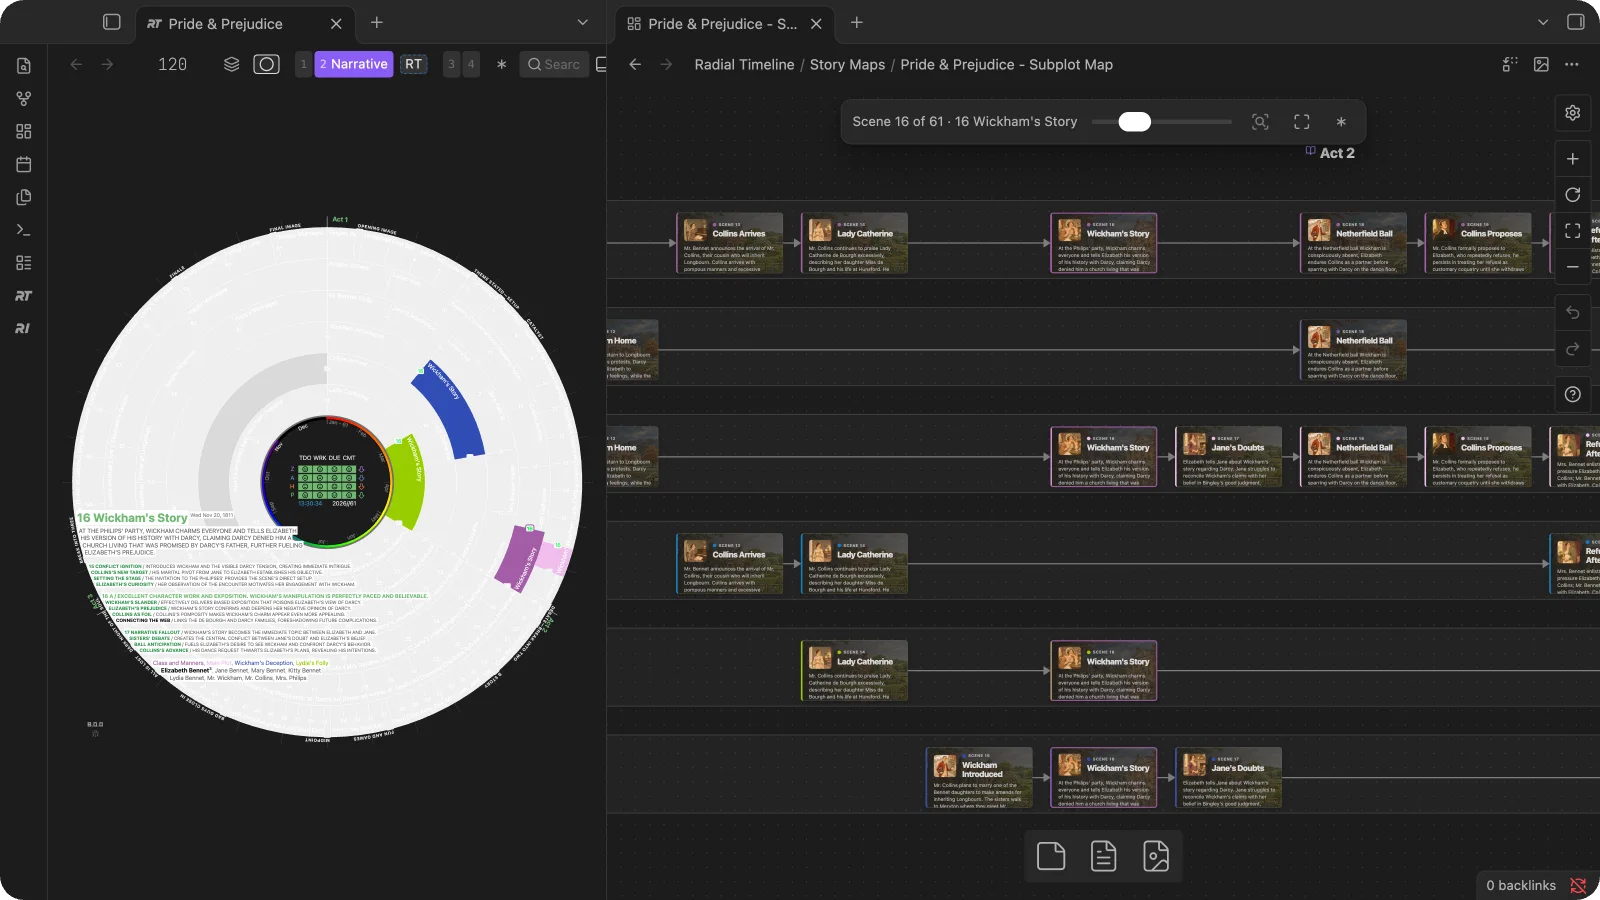
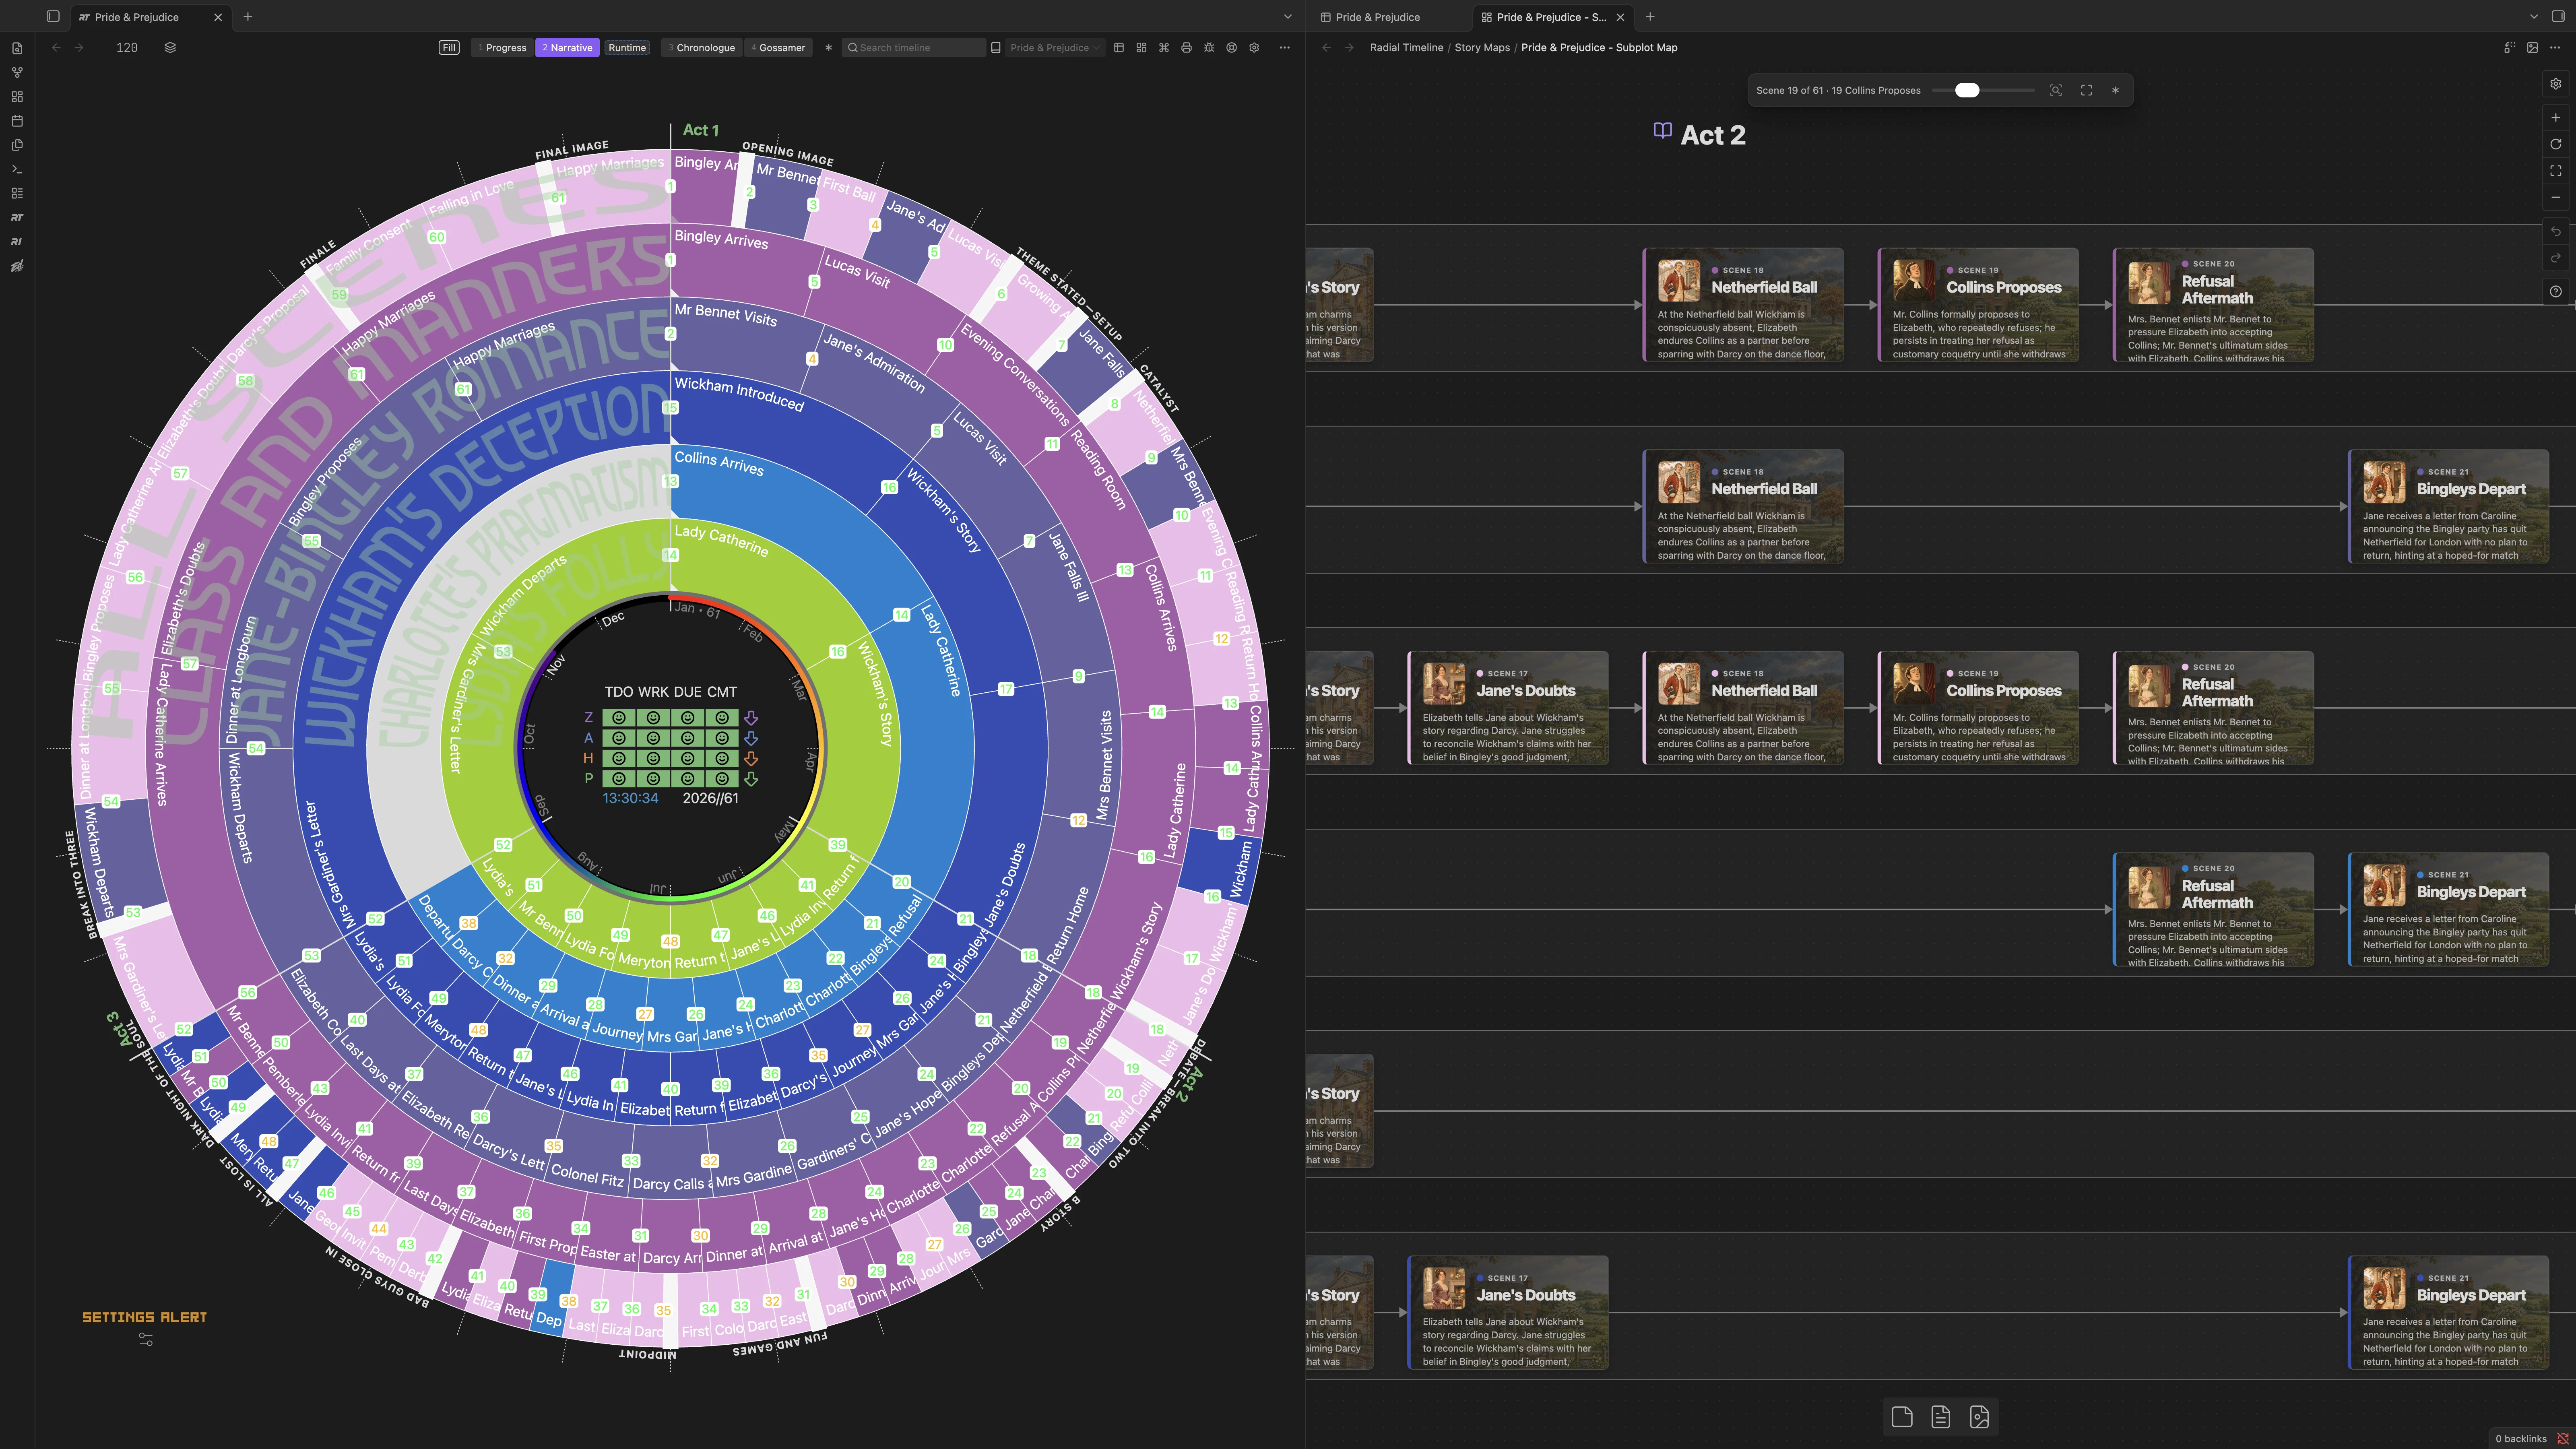
- Story navigation, the bar along the top of the map: drag the slider to travel scene by scene (Scene 16 of 61 · Wickham’s Story), Zoom to selection to frame the selected cards, or Fit all. Act labels stay readable when you zoom out. Switch to vertical lanes turns the map so its lanes run down the page, and Switch to horizontal lanes turns it back. Review map details opens the map review.
- Canvas card view, in the Canvas title bar: Preview (synopsis or opening text), Title, or Full note. Notes in your books open in Preview on any Canvas, and a choice here lasts until you close that Canvas. Other notes keep Obsidian’s usual look, and a Canvas with no book notes has no Canvas card view button. Double-click a card to edit its note. The same menu has the Panels image choices (Image combinations, Background treatment, Character selection, Image sizing and Portrait shape, shared with Panels), Show overdue scenes, which marks late scenes, and Follow Shift-hover from timeline in Canvas: hold Shift while you hover a scene on the wheel, and the map travels to it and holds it in view. Cards carry their subplot colors.
- The map and the wheel point at each other. Hold Shift as you hover a scene on the timeline and its cards light up on the map; click a card and its scene lights on the timeline and in the Timetable. A card’s menu adds Radial Timeline: Show in Timetable, Radial Timeline: Show on timeline and, for sketches and notes without a Class, Radial Timeline: Promote to scene.
Review a story map
Section titled “Review a story map”A story map remembers the book, scope and layout it was made from. When the manuscript moves on, the navigation bar shows Map out of date — review updates. The review lists new scenes, scenes no longer in the map’s scope, changed acts and subplots, a changed scene order, and the cards and connections you added, edited or removed on the Canvas. Create updated copy builds the current scene layout in a new Canvas and places your added and edited cards, with their connections, to its right. The original map stays as it is.
A map made before Radial Timeline 8.0.2 has no record of its original settings, so the review offers Create a clean map from the settings you choose. To bring your own cards along, close the review, select those cards on the old Canvas, and open the review again: Create map with selected cards places them together beside the new map. The old Canvas stays as it is.
Drop text onto a story map
Section titled “Drop text onto a story map”New in Radial Timeline 8.0.3. Drag selected text from any note onto a subplot lane of a story map to make it a scene there. While you drag, the map shows where it will go (Add to Main Plot after 5 Lucas Visit). Let go, give it a Title and check the Scene text, then select Create scene. The scene takes a number between its neighbors, the lane’s subplot and the act at that spot, and a Source link back to the note the text came from. Its card joins the lane, later generated cards move to make room, and your own cards and connections stay where they are. The map stays current, so it keeps taking drops.
Drop the text outside the lanes to make a sketch instead. Scenes drop onto maps made with Radial Timeline 8.0.2 or later; for an older map, use Review map details to create a tracked copy first. When the map is out of date, review it before adding a scene.
Bring ideas from Canvas
Section titled “Bring ideas from Canvas”Open an Obsidian Canvas and select Turn Canvas cards into scenes or sketches in its title bar, or run Radial timeline: Canvas convert cards to scenes or sketches. You can also find the action in the active Canvas file’s menu. Choose the book, then what to Create. Each selected card becomes a note in the book folder; its text stays in the note body, and its Canvas card becomes a link to the same note. Its position and connections stay in place, and so does its color, except that a scene’s card takes its subplot’s timeline color. Cards you leave out stay on the Canvas as they are, and existing file cards are left alone. The first line suggests the note’s title.
Scenes suit a story you have mapped out. Each selected card becomes a numbered scene at the end of its act, with its subplot and the scene template, and the timeline opens.
-
Acts: a card named Act 2 starts that act, and the cards after it join, reading down the map, or left to right when the Act cards run along the top. Cards ahead of every Act card join Act 1. With no Act cards, scenes spread evenly across the acts. The Act menu can put them all in one act instead. The dialog’s list shows where each act starts. Move up and Move down set the order; moving a card past an act break moves it into that act first.
-
Subplots: give each branch of cards its subplot on the Canvas. Right-click an idea card, or a selection of them, and choose Radial Timeline: Color by subplot. The list shows the active book’s subplots in ring order, each in its timeline color, then its new subplots marked new, with a check by the one the cards already stand for. Choose one and every card takes that subplot’s exact color. New subplot… at the bottom names a new subplot and gives its cards a free color from your subplot ring colors; the colors other subplots wear are shown with their names, and can’t be chosen. A new subplot belongs to its book: every Canvas of that book lists it, and no other new subplot can take its name or color, until its scenes exist or no card on any Canvas still wears it. Cards you color with Canvas’s own color tools are matched by their color in the dialog.
Radial Timeline remembers which subplot the menu gave each card, as long as the card keeps that color, and checks whenever a Canvas changes or opens and when Obsidian starts. A palette color can pass to another subplot as rings change order, so the dialog trusts that memory before the color. A card you copy keeps its original’s subplot when no other subplot was given that color on the Canvas. Rename a subplot with the Subplot manager and its color and the cards given it follow the new name. If you rename it by hand in the scenes’ properties, or remove it, those cards are matched by their color again. A card colored back after an undo (a redo) keeps its subplot.
In the dialog, each card color gets a row, and cards the menu gave different subplots get separate rows. A row starts filled in when its cards stand for a subplot: the one the menu gave them, the one their linked cards on the Canvas share, or the subplot, or new subplot, that wears exactly that color. Ring color changed marks a row whose subplot wears another color than its cards. Change any row by typing or picking from the same list; New subplot… there names one in a free palette color. Cards of that color join that subplot.
- A new subplot wears the palette color chosen for it, and the other rings keep theirs. When that color is the one its ring would take anyway, it simply follows the palette; otherwise the subplot keeps it as its own color. Typing a new name on a free palette color gives the subplot that color. Two rows given the same new name make one subplot in the first color; two new names can’t share a color, so the later one asks for its own (Choose color).
- One of your subplots keeps the color it already has.
- Every card color needs a subplot. A row with none is marked Needs a subplot, and a color outside the timeline’s colors, such as another Canvas color or a custom one, is marked Not a timeline color. Create waits until each such row has one of your subplots, or a new name with a palette color (Choose color). Cards with no color join Main Plot.
When you click Create, each new scene’s card takes its subplot’s timeline color, so the Canvas and the timeline match. A dot at the end of a row shows that color when it differs from the cards’, as the ring will look once the scenes join it: rings without a color of their own take palette colors in ring order, and ring order follows scene counts. The timeline opens, or an open one redraws, once Obsidian has read every new scene, so it appears complete and only once. Change or reset a subplot’s own color in Settings → Core → Subplot ring colors.
Sketches suit loose ideas. Choose an optional act, then where they go: Place after scene puts them after a scene you choose, and End of act or unassigned at the end of the act. Move up and Move down set their order. Sketches without an act appear unassigned in the Timetable. Review a sketch’s placement when you promote it to a scene.
The ✱ on the bar sums up the workflow and the map’s marks.
Arrows do not set manuscript order or dates, and moving cards afterward leaves the book as it is. If the Canvas changes during conversion, the action stops instead of overwriting the map. Any notes already created remain in the book folder. Canvas undo restores the text card but does not delete the note; converting it again creates another note. Advanced Canvas text cards can be converted too. If a selected card is connected through an Advanced Canvas portal, conversion stops so that connection is not broken.
Write sketches beside scenes
Section titled “Write sketches beside scenes”Use New sketch, or the + beside an act heading, to create a sketch in the book’s manuscript folder. A sketch has Class: Sketch and appears in the Timetable, keeping a place for an idea without putting it on the wheel yet. In Saga scope, use a book heading’s + to choose the book.
Click a sketch row or its drawer control to open it. The drawer starts with a Title field: press Enter or leave the field to rename the note through Obsidian, so links to it follow. A number prefix stays, characters a file name can’t hold become spaces, and a name already taken gets a number ( 2). New sketch starts with the cursor in Title, and Enter moves on to the text.
Write directly in the drawer and edit its Act and When there. The text is saved in the note body. If the note changes elsewhere while you type, the drawer asks which text to keep before overwriting anything. Open every sketch expands the sketch drawers together.
Drag selected text from any note onto the timeline or the Timetable. At Drop text to create a sketch, let go, then set the Book, Act, Sketch title and Sketch text in Create sketch. The text stays in its note, the sketch links back to it in Source, and it joins the end of the act. In Outline, drop the text on a row or an act to place the sketch right there. On a story map, the text becomes a scene on the lane you drop it on; see Drop text onto a story map.
Add a note to the book
Section titled “Add a note to the book”Drag a note from the file explorer onto the Timetable to add it to the book. Add note to the book asks how to Use this note as: a Scene, which needs a Scene number when its filename has none, or a Sketch, with Place sketch after a scene or End of act. A note with an Act lists the scenes of that act, and a note with none lists the whole book. Select Add note. The note moves into the book’s folder if it isn’t there already, and gains its Class, plus, for a placed sketch, that scene’s Act when the note has none; its text and other properties stay as they are. Where a placed sketch sits is kept with the rest of the sketch placement, not in the note. A note that already has a Class is left alone. With no book set up yet, Create book in the dialog makes your first one and carries on with the note.
On the timeline, drop a note in the empty space around the wheel for the same dialog. In Narrative or Progress, drop it on a scene instead to add it as a scene right after that one: it takes a number that fits after the scene, the scene’s act and the subplot of the ring you dropped it on. If the note already names a different act or subplot, the dialog asks whether to change it. Chronologue takes notes only in the empty space.
Promote a note to a scene
Section titled “Promote a note to a scene”Use Promote to scene on a sketch or a note with no Class. Review the proposed properties and placement, then promote it. Promoted on its own, a note that still has a placeholder name (Untitled sketch, or Obsidian’s Untitled) asks for a Scene title first and promotes once it has one; in the Position menu, Don’t number it keeps the new title without a number prefix. Existing property values and body text are preserved; missing scene-template properties are added. A note already classified as a scene, beat, or another kind of note is not reclassified by this action.
A sketch placed after a scene is promoted into that spot, with a scene number that fits between its neighbors without renumbering them; when none fits, it is left as a sketch and says so. Promote placed sketches one at a time. Open scene in the finished dialog opens the new scene.
You can also run Radial timeline: Scene promote note or use the file-explorer context menu, including a folder’s direct children or a multi-selection. Notes must be inside a registered book’s manuscript folder; notes outside every book are explained and skipped. The scene then appears on the wheel and in the Timetable.
Sketches promoted together keep the order they have in the Timetable: each takes a scene number at the end of its act, and a sketch with no act joins Act 1. Whole numbers are used where they fit, and decimals in a narrower gap, so the scenes around them keep their numbers. A sketch that already has a number keeps it, and a note with no Class keeps its name.
To go the other way, right-click a scene and choose Remove from timeline. Only its Class is removed: the note stays where it is, keeps its ID, act, subplots and text, and stays in its row here as a note with no Class, wherever it sits in the book folder. Promote it to bring the same scene back.
Other views in the same file
Section titled “Other views in the same file”| View | What it provides |
|---|---|
| Radial Timetable | The book view with status numbers, Rings, and sketch drawers, in the Table, Panels or Outline layout |
| Spreadsheet | Obsidian’s editable property table for spreadsheet-style changes |
| Not on the timeline | Notes without a Class, ready to review or promote |
| Act board | A board grouped by Act, on Obsidian 1.14 or later |
| Status board | A board grouped by Todo, Working, and Complete, on Obsidian 1.14 or later |
Files made before 8.0.0 keep their Timetable and Table names. The Saga file provides Radial Timetable and Spreadsheet views. To change scene order or subplot membership on the wheel, see How to. For story-time placement, see Chronologue Mode.
Headings set in Kalice, Claude Type, designed by Margot Lévêque.